Zoom
This page provides links to training opportunities, step-by-step guides, and FAQ designed to help UCSD instructors use Zoom for remote teaching.
Zoom is the video and web conferencing tool supported by EdTech Support. Zoom Pro accounts are available to all campus faculty, staff, and currently-enrolled students at ucsd.zoom.us. These accounts allow any UCSD affiliate to host meetings with up to 300 participants.
Zoom Training
From EdTech Support
EdTech Support offers Zoom workshops covering the major features of Zoom meetings and specific recommendations for using Zoom for instruction at UC San Diego. Refer to our workshop calendar for available workshops and dates, or watch our previously recorded training session on Zoom Best Practices.
From Zoom
Zoom trainers host free and interactive live-training webinars daily. These sessions are less than an hour, and cover subjects such as getting started with Zoom meetings, advanced meeting features, and planning and running Zoom webinars. If you are brand new to Zoom Meeting or Zoom Webinar, we highly recommend you start here.
Step-by-Step Guides
The following guides describe our recommendations for using Zoom for instruction at UC San Diego. By following these recommendations, you will be set up for secure, successful class meetings in which you can use any and all of the active learning tools Zoom has to offer, including screen share, polling, and breakout rooms. If you need to complete a task that is not covered here, please email zoom@ucsd.edu for support.
Get Started
In order to get started using your new Zoom Pro account, sign in at ucsd.zoom.us.

You may be asked to verify your email address by clicking a unique link that Zoom sends to your email address. It can take a few minutes for the email to arrive after you've authorized Zoom to send the email.
If you notice that your Zoom account is tied to an email address you don't recognize, or one that you are not using in Canvas, please email zoom@ucsd.edu to have this resolved.
If you have any trouble downloading or opening the Zoom software, make sure your device meets Zoom's system requirements.
Configure Settings
The following describes settings we recommend that you update for security and ease of instructional use. To configure these settings, navigate to https://ucsd.zoom.us/profile/setting. There are a lot of settings on this page, so we recommend using Ctrl/Cmd + F to search for the setting you are interested in.
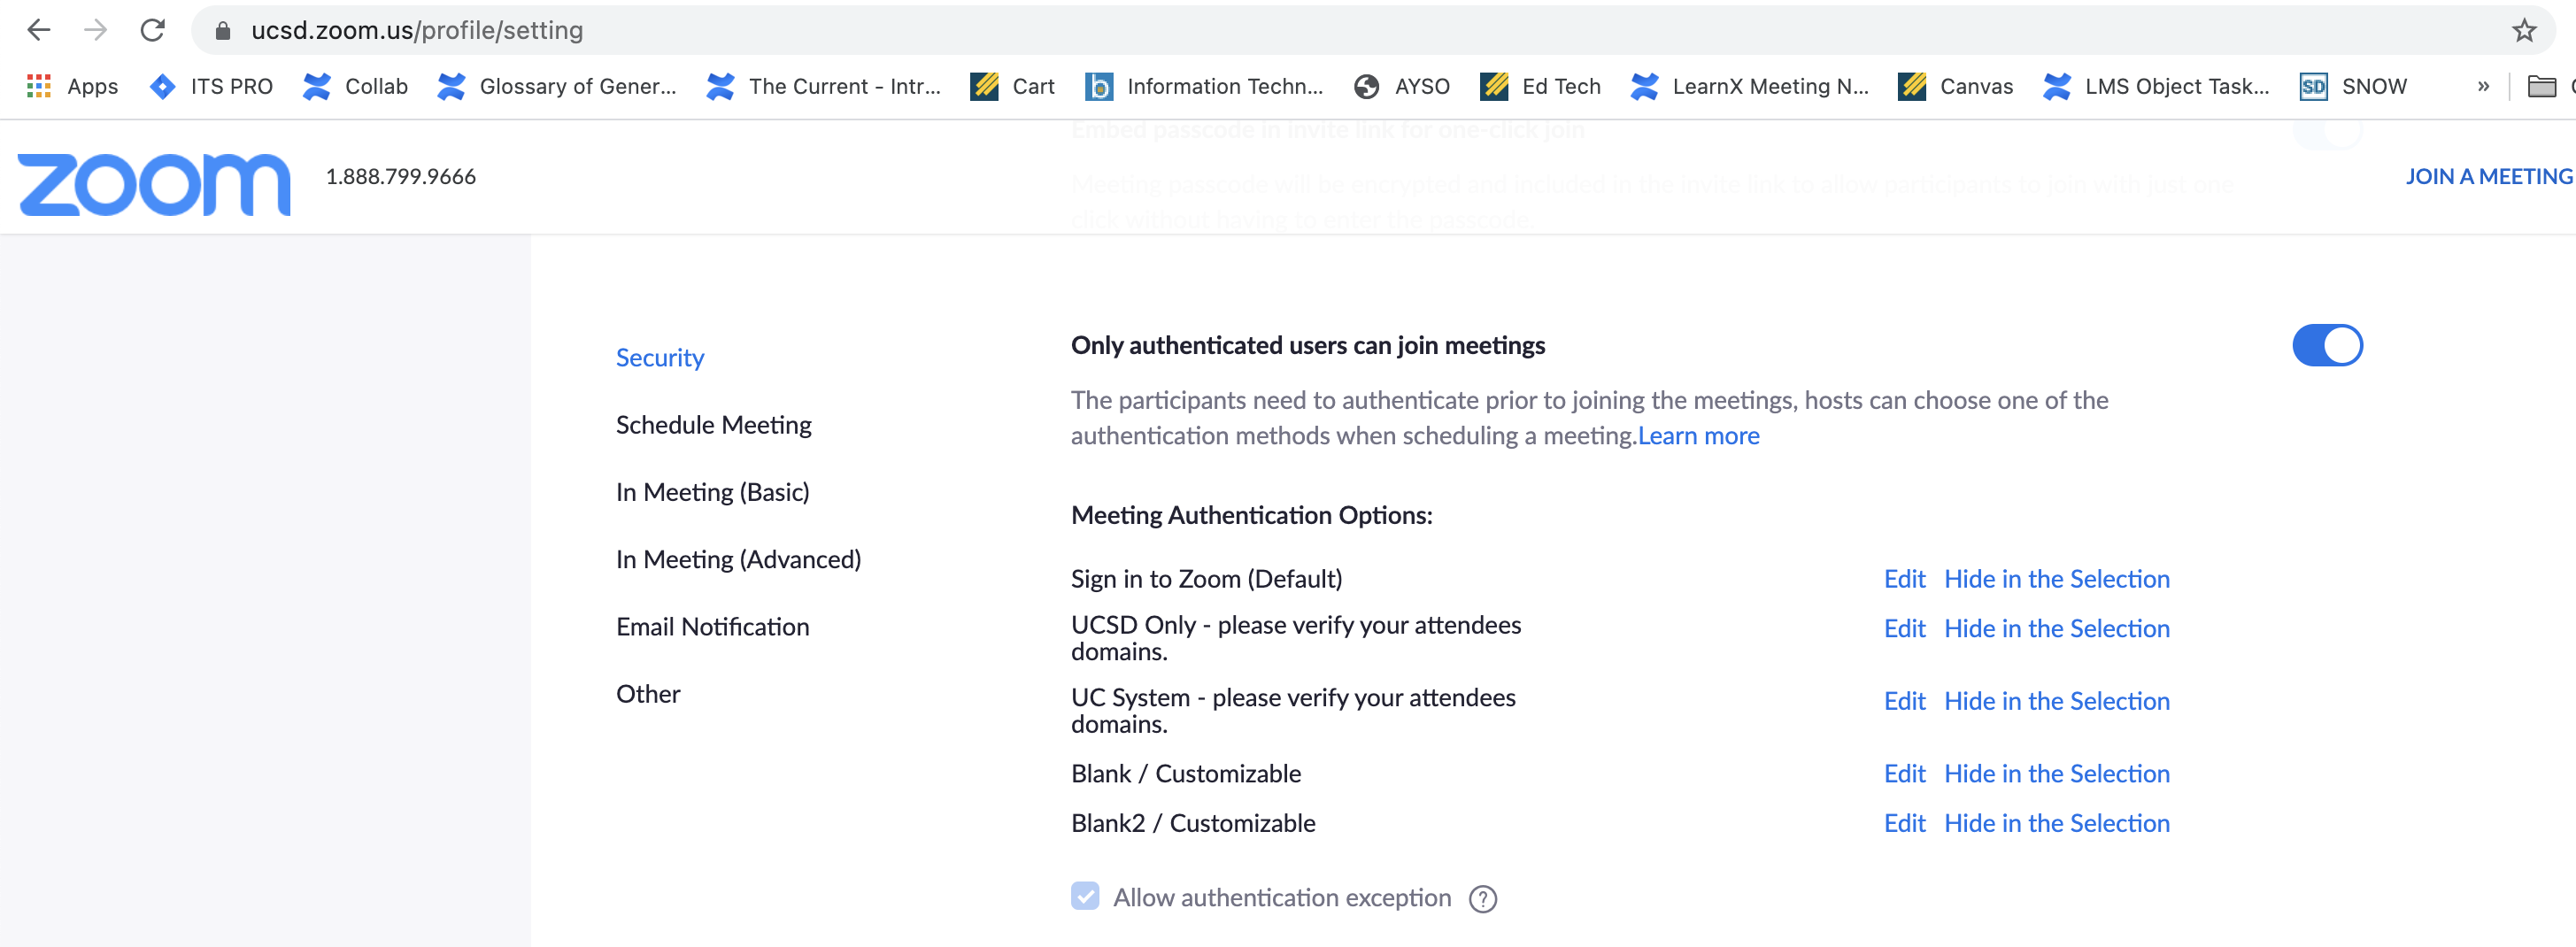
Require authentication
So that you can require students to sign in to their UCSD Zoom Pro accounts before they join a class meeting, be sure that "Only authenticated users can join meetings" is turned on.
This is recommended for security.
It is also necessary in order for pre-assigned breakout rooms to work effectively.
And it ensures that student names will appear in participant reports as it does on your roster.
Chat
Consider chat settings carefully taking both engagement and security into account.
You can leave the "Chat" setting on to allow meeting participants to send a message visible to all participants.
You also have the option of turning off "Private chat" to disallow private messaging between meeting participants.
If you are using chat extensively for class discussion, you may want to turn on "Auto-saving chats" so that you have a record of those discussions.

Schedule & Configure a Meeting
We recommend that you use the Zoom link in the course navigation menu of your Canvas course site to schedule and manage Zoom meetings for your course. When you create a Zoom meeting this way, students are automatically notified and sent the meeting link. They can also use the Join button in Canvas to join each class. This is the most convenient and most secure way to share meeting information with your class.
When you first click the Zoom link in Canvas, you will be asked to Authorize Zoom's access to Canvas. This is safe to do. Then, you'll be ready to start scheduling meetings.
To schedule your meetings, follow these steps:
- Select Zoom on your course navigation menu.
- Click the blue Schedule a New Meeting button in the upper right of the page.
- Select the settings you would like for your Zoom meeting.
- Topic: Enter in a name for your session.
- Add Sections and Groups: By default, meetings are available to all users. A meeting can be scheduled for a specific section or Canvas group.
- Add Viewers (to recordings): No information needs to go here, as recordings for UC San Diego are sent to the meeting owner's My Media for distribution.
- Scheduling options: Select the date, start time, duration of meeting, time zone, and whether or not this will be a recurring meeting.
- Security options: Check Passcode to require a passcode for the meeting, and Waiting room to put participants in a waiting room when the enter the meeting. Passcodes are embedded in the Join button students use to enter the meeting in Canvas. So, you do not need to share the passcode with anyone, your meeting will be protected, and your students will be able to enter seamlessly from the Zoom link within Canvas. If you use the waiting room, you will need to admit participants into the meeting manually.
Check "Only authenticated users can join meetings" if you have only UCSD affiliates in class, choose "UCSD Only - please verify your attendees domains" from the dropdown menu. If you have guest lecturers, interpreters, concurrently enrolled students from other institutions, or other attendees who do not have UCSD email addresses, choose "Blank / Customizable" from the dropdown menu, and Edit to add the domains of the additional attendees email addresses (e.g. boisestate.edu). - Audio and Video options: Select whether or not you would like to use a webcam and whether to allow your students (participants) to share webcam video. For the audio options, we recommend selecting both so that if your students have any trouble with using their computer audio they can easily dial in to the meeting via a phone as well.
- Meeting options: Select the options that you wish to use. If there are meeting options you wish to enable that are not available, you may enable those in the Zoom web portal after you have finished scheduling the meeting in Canvas. For all lecture meetings, we recommend the following:
- Uncheck "Enable join before meeting."
- Check "Mute all participants upon entry."
- Alternative Hosts: If you wish to allow an UCSD Zoom licensed TA or co-instructor to start your meeting for you, enter in their email address. If you'd like additional staff to have host-like controls in the meeting, you can assign a co-host from within Zoom at any time during your meeting.
- Click the blue Save button at the bottom of the page.
- A meeting summary page will appear. On this page you can view the join URL or the meeting invitation. You can navigate away from this page by clicking Course Meetings in the upper left of the page to go back to your course's Zoom landing page. You can navigate back to the meeting summary page at any time if needed.
Direct Students on How to Join
For both security and convenience, the best way for students to join your Zoom meetings is through Zoom course navigation link or the course calendar in Canvas.
Please keep in mind that joining the meeting through Canvas does not automatically sign students in to their UC San Diego Zoom account. So that they are sure to be signed in with the same email address that you have on your roster, please direct them to sign in to their Zoom account at ucsd.zoom.us before joining your class meeting.
If they have any issues being allowed into the meeting, being sent to their correct pre-assigned breakout room, or even viewing a Zoom recording after the meeting, it is most likely due to the fact that they are not signed in to their UC San Diego Zoom Pro account. Please direct them to sign in at ucsd.zoom.us, and try again.
Host a Meeting
Becoming fluent with the following controls will help your class meetings run smoothly.
Screen share
- For an overview, watch this video guide about how to share your screen.
- If possible, share a specific application (e.g. PowerPoint or Chrome) rather than your desktop
- For sharing video clips:
- Check “Share Computer Sound” (be sure other sounds like email notifications are off).
- Check “Optimize for full screen video clip.” Do not check this if not sharing video, as it may cause the shared screen to be blurry.
Breakout rooms
- For an overview of breakout rooms, watch this video guide.
- You can create breakout rooms during a meeting or pre-assign them.
- Pre-assignments for breakout rooms can be made in Canvas when creating a meeting. The course roster will be pre-populated. Users must have a Zoom UCSD account to be placed into a pre-assigned breakout room. Students who do not have a UCSD Zoom Pro account will be grayed out and instructors will need to manually add the users to a breakout room during the meeting.
- Pre-assignments for breakout rooms can also be made when scheduling a meeting within Canvas. Click on the name of your meeting, scroll to the bottom of the page and select "Edit this meeting," then check "Preassign breakout rooms" under Meeting Options.
- When breakout rooms are started, participants who are not assigned to breakout sessions will remain in the main meeting when the rooms are started.
- Hosts or Co-Hosts can assign participants to breakout rooms during the meeting.
- As the host, you’ll be able to communicate with students in the breakout rooms and move from one to another.
- A co-host can leave and join any breakout room only if they join a breakout room assigned to them by the host first.
Polls
- For an overview of polling in Zoom meetings, watch this video.
- Polling questions can be added via the web portal (ucsd.zoom.us), or by using a CSV in Canvas through the Zoom course navigation link prior to the meeting, or during a meeting.
- Click the meeting you want to add questions to. The option to add poll questions will be at the bottom of the page.
- Max: 50 polls for one meeting, with 10 questions each.
- To allow for polls to generate a Canvas assignment, navigate to the Zoom link in the Canvas course navigation. At the top right, select the three vertical dots and choose Enable / Disable Zoom Polls to Gradebook. Then, choose Enable.
- After class, allow processing time after the meeting for the assignment to be automatically created and for student results to render. The assignment will be automatically out of 100 points. The assignment cannot be automatically graded. Only those students who are signed in with their UCSD student Zoom accounts will receive results.
- The meeting owner can also download a report of the poll results in the Reports tab of the web portal.
Managing Participants
- Hosts and Co-hosts are able to manage participants from the Participants window.
- This is how you will mute participants, stop their video, and remove them from the meeting if necessary.
- This written guide covers these controls and how to use them.
Protect Your Meeting
To prevent Zoombombing, we recommend that you enable a passcode and require authentication for your meetings. If you have only UCSD affiliates in class, you can require that students are signed into their UCSD Zoom Pro account when entering the meeting. If you have non-UCSD affiliates joining class meetings—such as interpreters, concurrently enrolled students from other institutions—you can also allow the domains of the additional attendees email addresses (e.g. @ucla.edu). See the Host a Meeting section of this guide for details on how to enable these for your meetings.
To address any disruptions that may occur during class, we recommend that you become fluent with your meeting controls. Know how to:
- Mute participants and revoke consent to be unmuted
- Stop a participant's video, put a participant in the waiting room or remove a participant from a meeting.
- Disallow participant screen sharing, and turn off chat.
Learn about Zoom Meeting Safeguards to keep your meeting secure.
Record a Meeting
If you'd like to record your Zoom meetings, check Record the meeting automatically in the Meeting Options section of the scheduling form. To have the video automatically uploaded to Canvas, and to allow for automatic captioning, leave In the cloud selected. These videos will be uploaded to Kaltura My Media, where they will not be limited by Zoom's 30 day cloud limit.
Consider which meeting layouts to use to optimize Zoom recordings for Kaltura (MyMedia, MediaSpace, MediaGallery).

Make a Recorded Meeting Available in Canvas
If you have a Zoom meeting recorded in the cloud, the recording will automatically be added to My Media in Canvas. Even though recordings are deleted from the Zoom cloud after 30 days, the videos in My Media will be available to you for longer. Learn about UCSD-Kaltura's Data Retention Practice.
Learn about your Zoom and Kaltura settings to ensure that you're familiar with how everything works.
In order to make a recording visible to students, you will need to publish it to Media Gallery or embed it in your course content.
Making Recordings Available in the Zoom Cloud (Not Recommended)
Recordings will remain in the Zoom cloud for only 30 days. If you choose to share recordings directly in the Zoom cloud you may need to provide a password or disable Zoom's default password requirement. The notification email telling you the recording is ready also provides a randomly generated password for accessing the recording.
To remove the password requirement for a meeting, navigate to the Recordings tab in the Zoom web portal. Click on the meeting that has been password protected, then click the Share button in the upper right hand corner of the page. The password should be visible on the sharing pop up. Click the toggle for "Password protect" to turn it off.
To remove the password requirement for all future meetings, navigate to the Recording Settings in the Zoom web portal, and find "Require password to access shared cloud recordings". Click the toggle to turn off that setting, and recordings created moving forward will not require a password.
Troubleshoot Issues
In-Meeting
Test out your hardware before the quarter commences in a test Zoom meeting. This test meeting will guide you through connecting your camera and microphone.
If you're having audio or video trouble with Zoom, the following guides may help:
- Testing Computer or Device Audio
- Joining a Meeting by Phone
- Audio Echo in a Meeting
- How do I test my video?
- Zoom System Requirements
If audio or video start to get choppy during a meeting, consider turning off video to preserve audio.
Zoom in Canvas
If your email address in Canvas does not contain the full spelling of your last name, you will see an error message when you attempt to use Zoom in Canvas's course navigation. To resolve this issue, please copy the error message and email it to zoom@ucsd.edu.
Recordings in My Media
The same issue that causes the Zoom error described above will prevent cloud recordings from appearing in My Media until it is resolved.
Slow internet speeds or monthly data caps enforced by your ISP may make downloading and uploading your Zoom recordings infeasible. If this applies to you, reach out to kaltura@ucsd.edu and we'll help! When you reach out, please provide the following information:
- your UCSD username
- the title of your Zoom meeting
- the date and time when your Zoom recording started
- the Zoom Meeting ID (if possible)
FAQ
Will I lose access to my Zoom cloud recordings after 30 days?
When you record a Zoom meeting to the cloud using your UCSD Zoom Pro account, the recording will automatically be added to My Media in Canvas. The videos in My Media are not subject to the Zoom limits, and will be available to you longer. Learn more about UCSD-Kaltura's Data Retention Practice.
Why can't some students view my recordings?
By sharing the Zoom recording links directly, some of your students may have trouble viewing the recordings. Because of access issues, and because the recordings become unavailable after 30 days when shared this way, we recommend a different method of making your recordings available to students.
When you have a Zoom meeting recorded in the cloud, the recording is automatically added to the meeting owner's My Media space in Canvas in about 24 hours (in rare cases, it can take up to 72 hours). In order to make the recording visible to students, you will need to publish it to Media Gallery or embed it in your course content.
These step-by-step guides from our Multimedia Services team will walk you through that process.
Can I use one Zoom link for office hours for all of my courses?
You can absolutely use the same Zoom meeting for general office hours. When you schedule the meeting as recurring, the same meeting invitation/link will apply to all of your office hour sessions. You can then paste the invitation information into your syllabus and/or into an announcement for each of your classes along with the days of the week and times of your office hours. This will look similar to how you've communicated your office hours to students previously, except that the "location" is now the Zoom meeting instead of your office.
How can I stop meetings from being recorded outside of class time?
Meetings that are set to automatically record will start recording at any point that a person enters that meeting. In order to avoid students inadvertently recording a snippet when they test the link, you'll want to turn off the setting that allows participants to join before the host. That way, you'll have to start the meeting in order for any recordings to happen.
Why do I have multiple recordings of one meeting in My Media?
Zoom allows you to capture multiple views of your meeting and save them all during cloud recordings. Each of these views is then automatically copied to your My Media area in Canvas. The videos may look similar based on their thumbnail preview, show a student’s name/video at the start, or have the same duration, so it can be confusing as to which one to publish for later viewing.
If you wish to delete one of the videos, you’ll need to view each video briefly to see which meeting layout you want to keep. We recommend that you fast-forward to any section of the video where screen sharing occurred to identify quickly which video you prefer. Note that when the video is deleted from “My Media,” you will not be able to recover it. Zoom also provides auto-captioning on the “active speaker with shared screen” view so you can quickly identify that option by the presence of closed captions on the video.
If you wish to preserve both copies of your Zoom recording, you may want to rename the videos to help you identify which video is which at a later date.
For more information about managing your course videos, see the Videos in Canvas page.
To disable unwanted recordings of future meetings, go to your Zoom settings and check only the options for the recordings you want to access in My Media. We recommend only enabling “Record active speaker with shared screen” unless you have a specific need for other layouts.
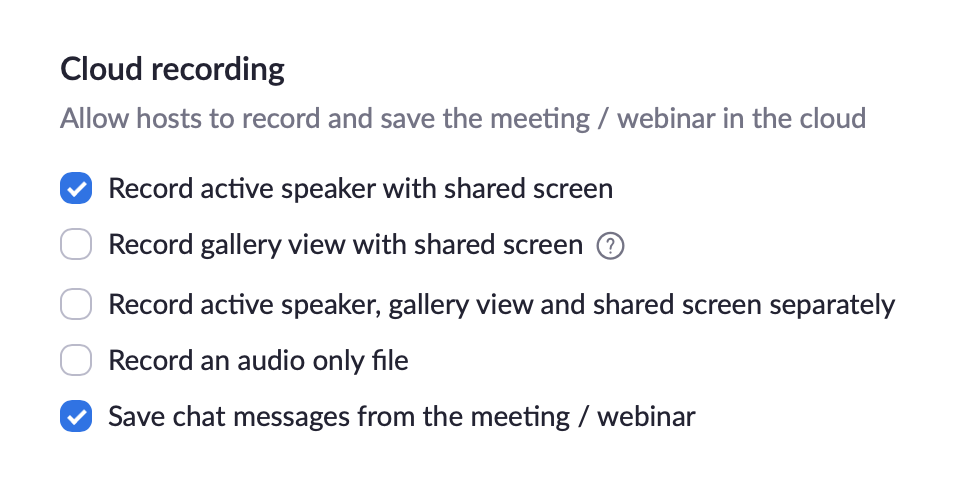
For further details, see the Zoom documentation regarding Cloud Recording and Recording Layouts.
Why aren't my breakout room pre-assignments working for all students?
If you have set up breakout room pre-assignments, but when you open breakout rooms, some students are not sent to the proper room, it is because they are not signed into Zoom with the email address that you used for them when setting up the pre-assignments. There may be two reasons for this:
1. They are not signed into their UCSD Zoom Pro account.
Direct your students to sign in using SSO at ucsd.zoom.us before joining the meeting. So that you can require students to sign in to their UCSD Zoom Pro accounts before they join a class meeting, turn on "Only authenticated users can join meetings" in your Zoom settings.

Then, in the Meeting Options for your Zoom lecture, check the box for "Only authenticated users can join," then choose "UCSD Only - please verify your attendees' domains" from the dropdown menu, and click Save.
After making this change, we recommend sending an announcement out to your students explaining that they will not be able to join the next class meeting without being signed in to their UCSD Zoom account. They can sign in using SSO at ucsd.zoom.us.
2. Their UCSD Zoom Pro account is tied to a different email address than the one you have on your roster.
After following the steps above, there still may be a few students who are not automatically placed in breakout rooms. In these cases, please email us the names and email addresses of the students experiencing the issue at zoom@ucsd.edu to resolve this mismatch.
Can I make someone a co-host automatically by making them an alternative host of a meeting?
In the meeting scheduler, you can list people who you would like to assign to be Alternative Hosts. The only power alternative hosts have is to start the meeting for you. Users who are being added as an alternative host must have a licensed UCSD Zoom account. Note that alternative hosts are not given co-host controls in the meeting. The only way to truly give someone co-host controls is in the meeting itself.
There are two ways that you can make a user a co-host within the meeting.
Once a participant has been made a co-host in the meeting, they'll have access to the co-host controls.
There are two ways that you can make a user a co-host within the meeting.
Option 1 - User's Video
- Hover over a user's video.
- Click the ellipsis icon
- Click Make Co-Host.
Option 2 - Participants Window
- Click Participants in the meeting controls at the bottom of the Zoom window.
- Hover over the name of the participant who is going to be a co-host, and choose More.
- Click Make Co-Host.
Once a participant has been made a co-host in the meeting, they'll have access to the co-host controls.
How can I be sure that my concurrently enrolled students and/or guest lecturers will be able to join my meetings?
When scheduling your class meeting, under Meeting Options, check "Only authenticated users can join." When you have saved your meeting:
1) Navigate to the Zoom web portal.
2) Click on the topic of your course meeting
3) Scroll to the bottom of the page and click Edit
4) Find "Authentication Exception" in the Security section and click Add.
5) Add the email address of the individual(s) who need the exception.
6) Save the meeting changes, and double check to be sure you can see the exception in the Security section.
Please note that users who do not have ucsd.edu email addresses cannot register for Zoom meetings without our Zoom account. So, please be sure that registration is not required for these class meetings.
Why isn't my iPad connecting to screen share?
Via Airplay
Your iPad and computer must be connected to the same WiFi network in order to use this option. If you're having trouble, check to see if they are on different networks. If they are, connect to the same network on both devices, then try again.
Via Cable
If you tap Trust or Don't Trust but t your answer isn't accepted, or if the Trust alert won't appear, follow these steps. Try again after each:
- Make sure that your computer has the latest version of macOS or the latest version of iTunes.
- Disconnect and reconnect your device from your computer.
- Restart your computer.
- Restart your device:
- Reset your Trust settings.
If the above steps don't help, go to Settings > General > Reset and tap Reset Network Settings. This also resets Wi-Fi networks and passwords, cellular settings and VPN and APN settings that you’ve used before.
If you downloaded iTunes for Windows from the Microsoft Store, make sure that iTunes Mobile Device Helper is enabled as a startup item.
If you still need help, contact Apple Support.