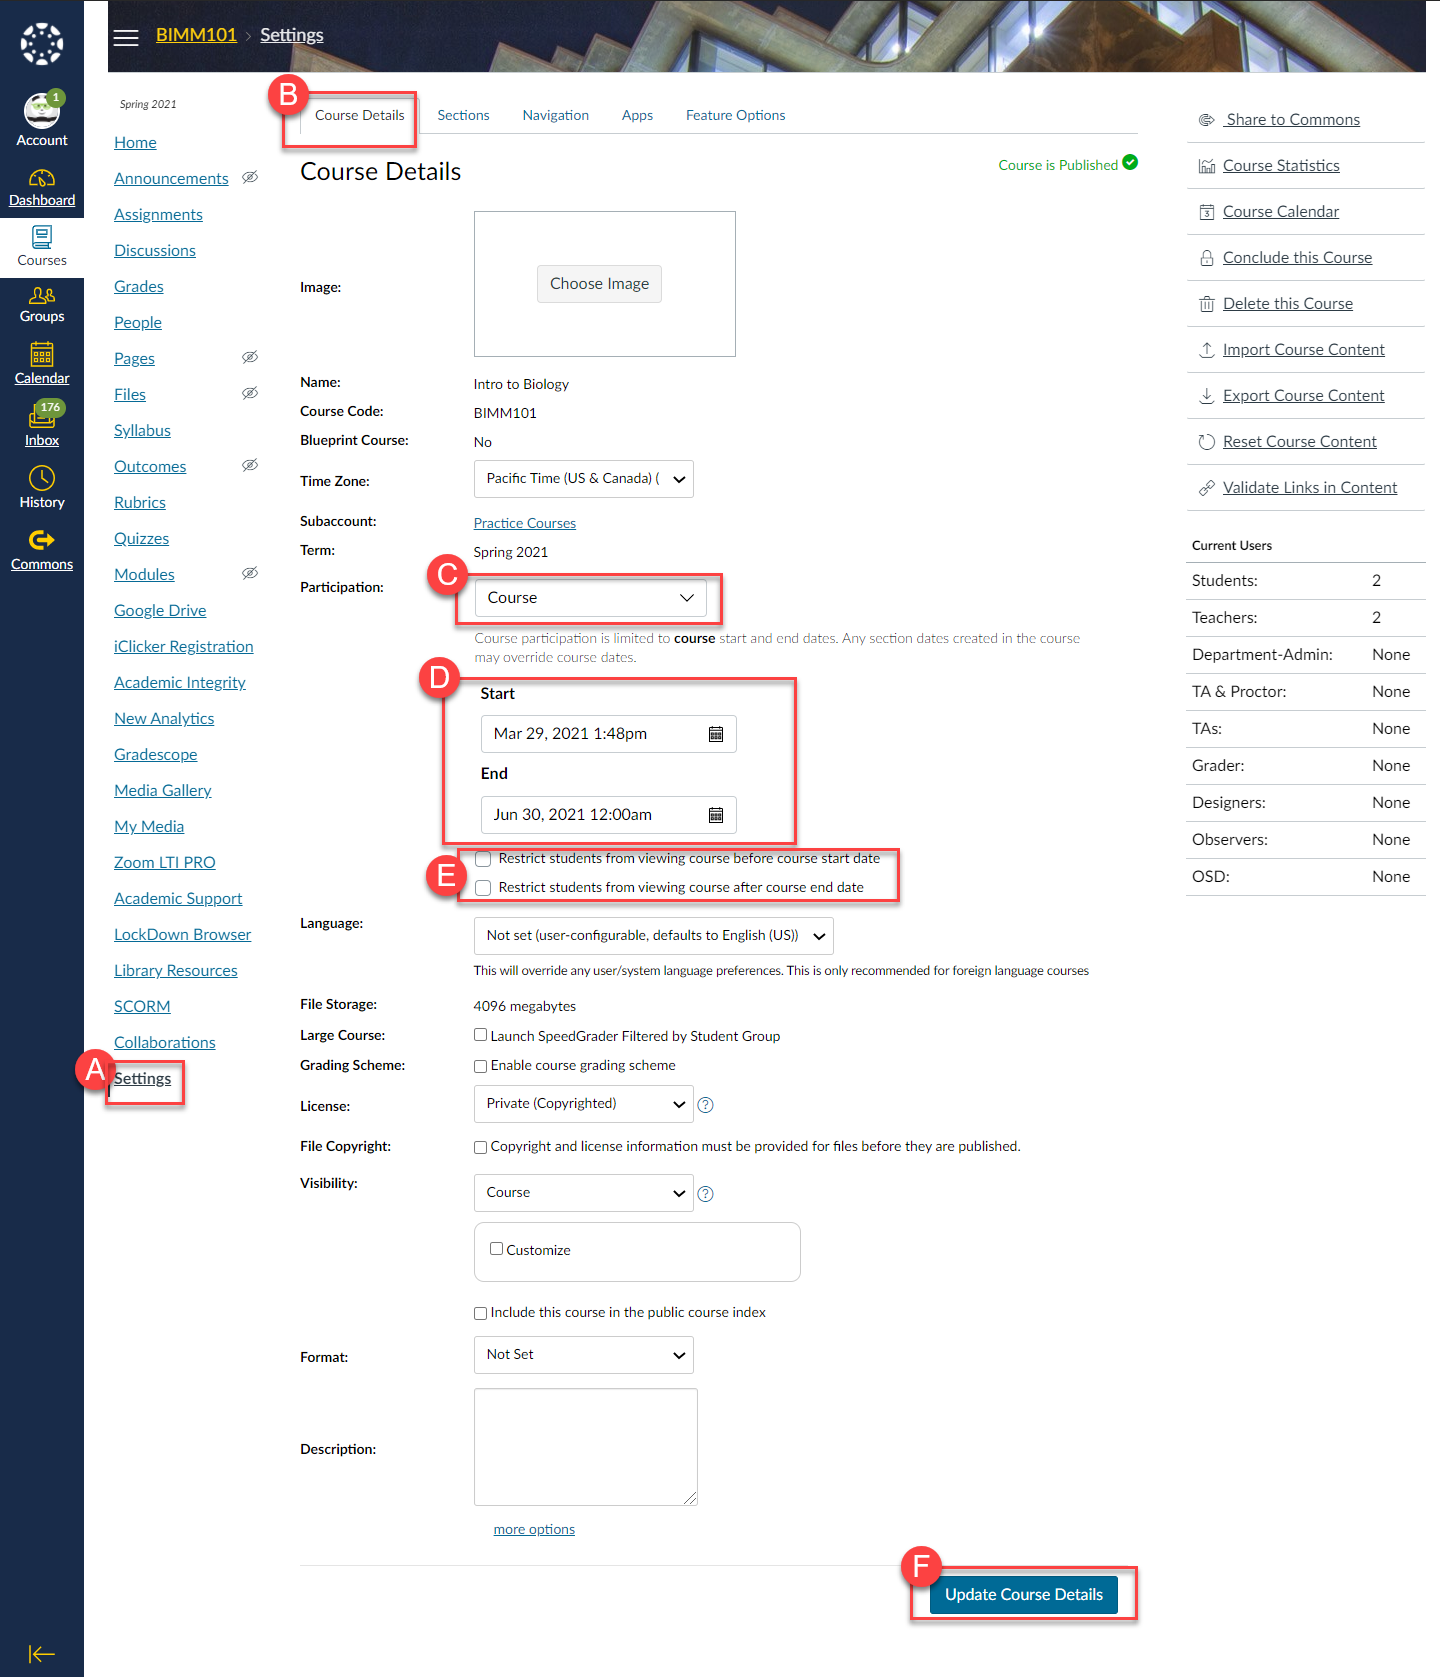
Students, by default, will not be able to access any content or messages prior to the official first day of the term. You can extend/shorten the student access period in your course by adjusting the start and end dates.
Instructions
- Click Settings.
- Click the Course Details tab.
- Locate the Participation field and choose Course.
- Fill out the Start and End fields.
- If no end date is provided, the course will be available indefinitely to students. This may increase student inquiries as to why the course remains on their Canvas dashboard after the term concluded.
- Check off if you would like to restrict the students viewing the course before or after the course dates.
- A start date and end date is needed for these features to work.
- Click the Update Course Details button.
Detailed step-by-step instructions: Set Custom Course Dates (text-based instructions)
Visual Aid
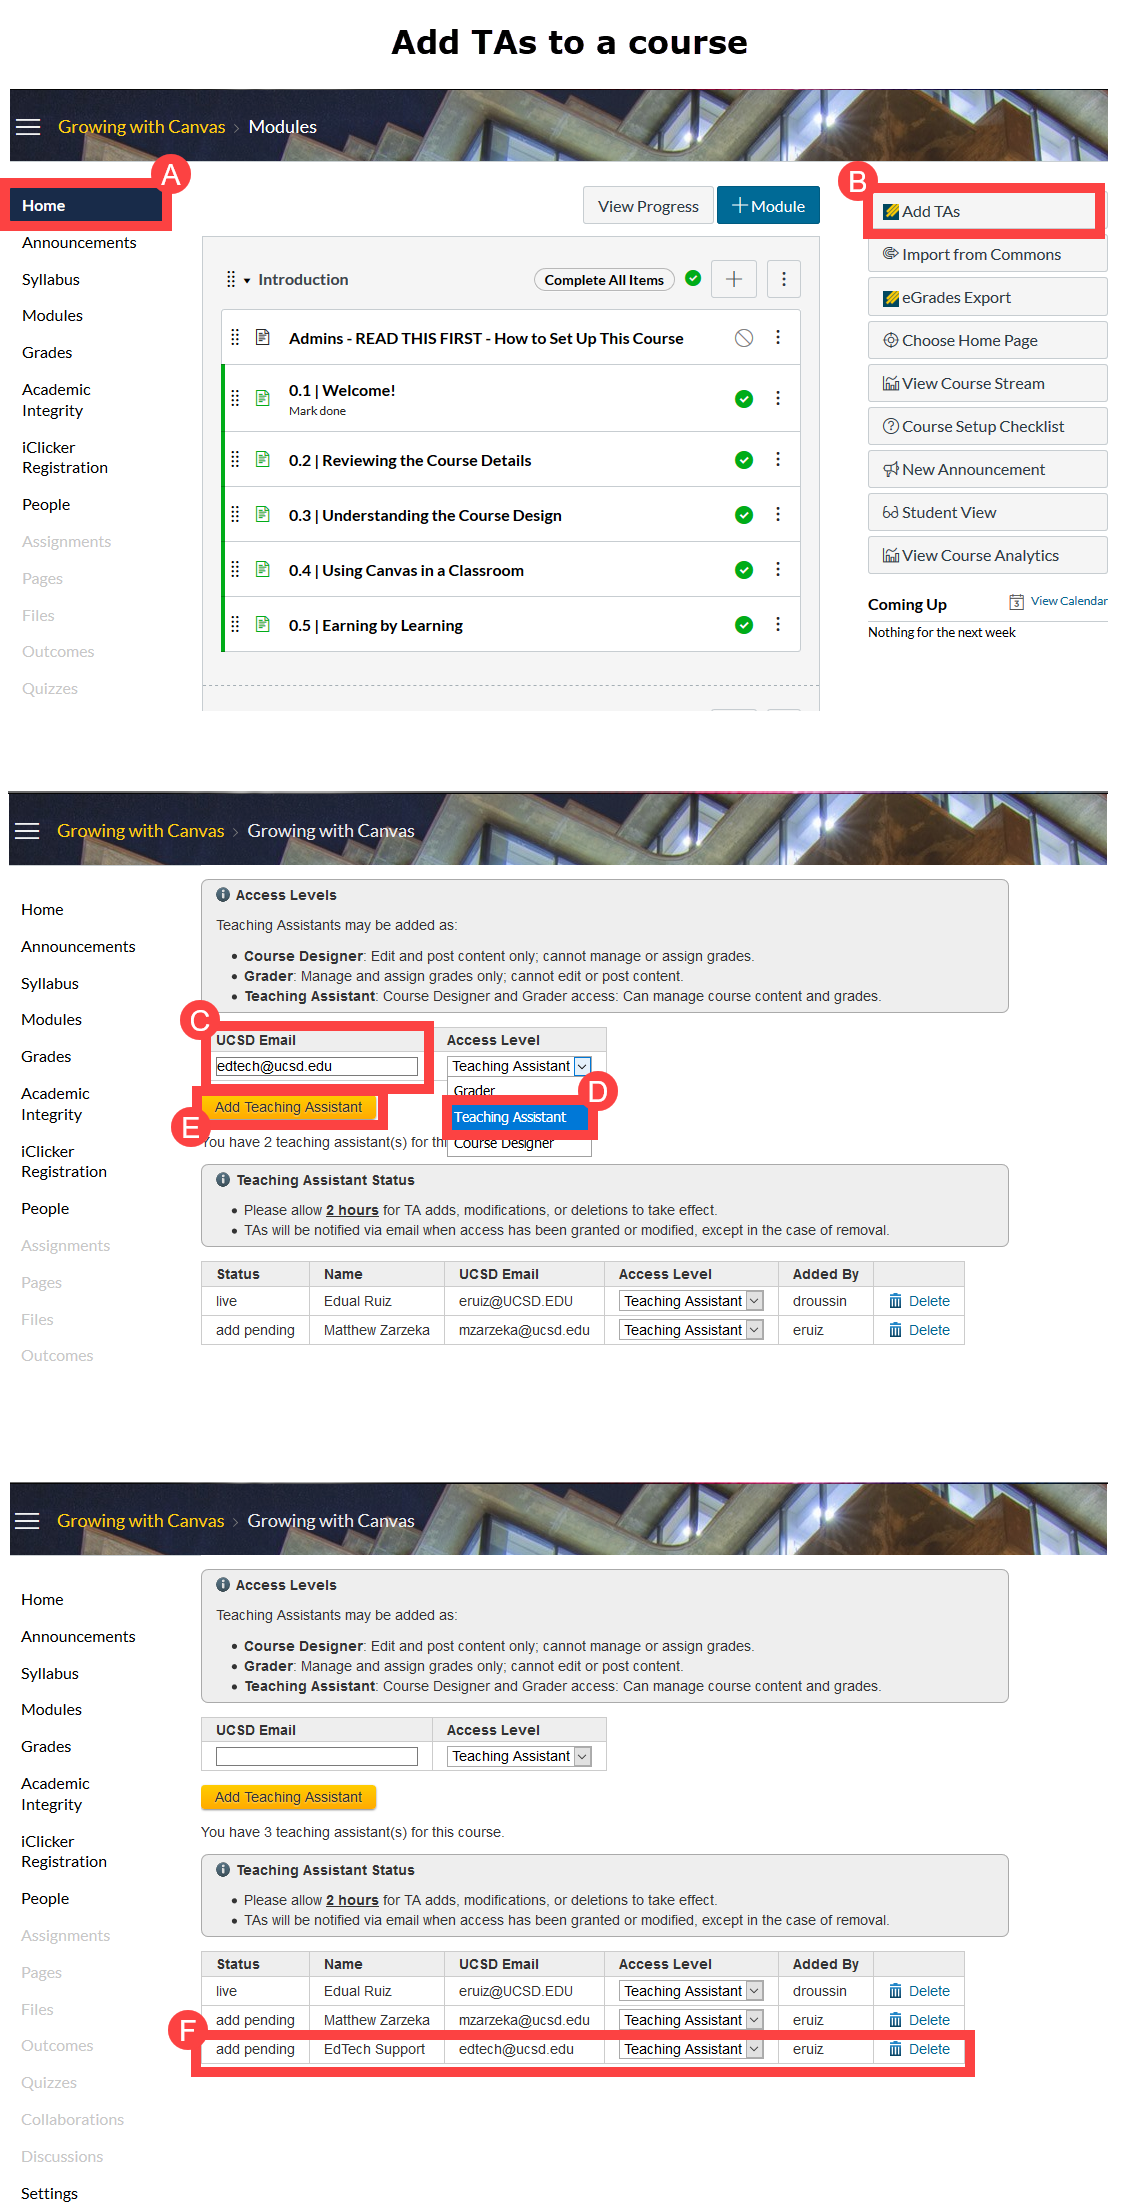
TAs, observers and other instructional staff can be added to a Canvas course by the instructor of record. The teacher role is typically reserved only for the instructor of record, and is, therefore, not an option for other users in the course.
Instructions
- Go to your course homepage.
- Click the Add TA button in the sidebar.
- Type in the user's UC San Diego email address.
- Only use AD email address. Do not use alias emails or extensions, like "@eng.ucsd.edu".
- Select the appropriate role for the user from the dropdown list.
- The TA role allows user to add, edit, and delete content, as well as view, enter, and edit grades.
- The Grader role allows user to view, enter, and edit grades only.
- The Designer role allows user to add, edit, and delete content only.
- The Observer role allows user to view the course content.
- Peer Educator: This role is for use exclusively in courses partnering with Academic Achievement Services with the Teaching and Learning Commons.
- Click the Add Teaching Assistant button.
- The user will be added to the enrollment queue, which runs every two to three hours (Daily, 7am until 7pm).
Visual Aid
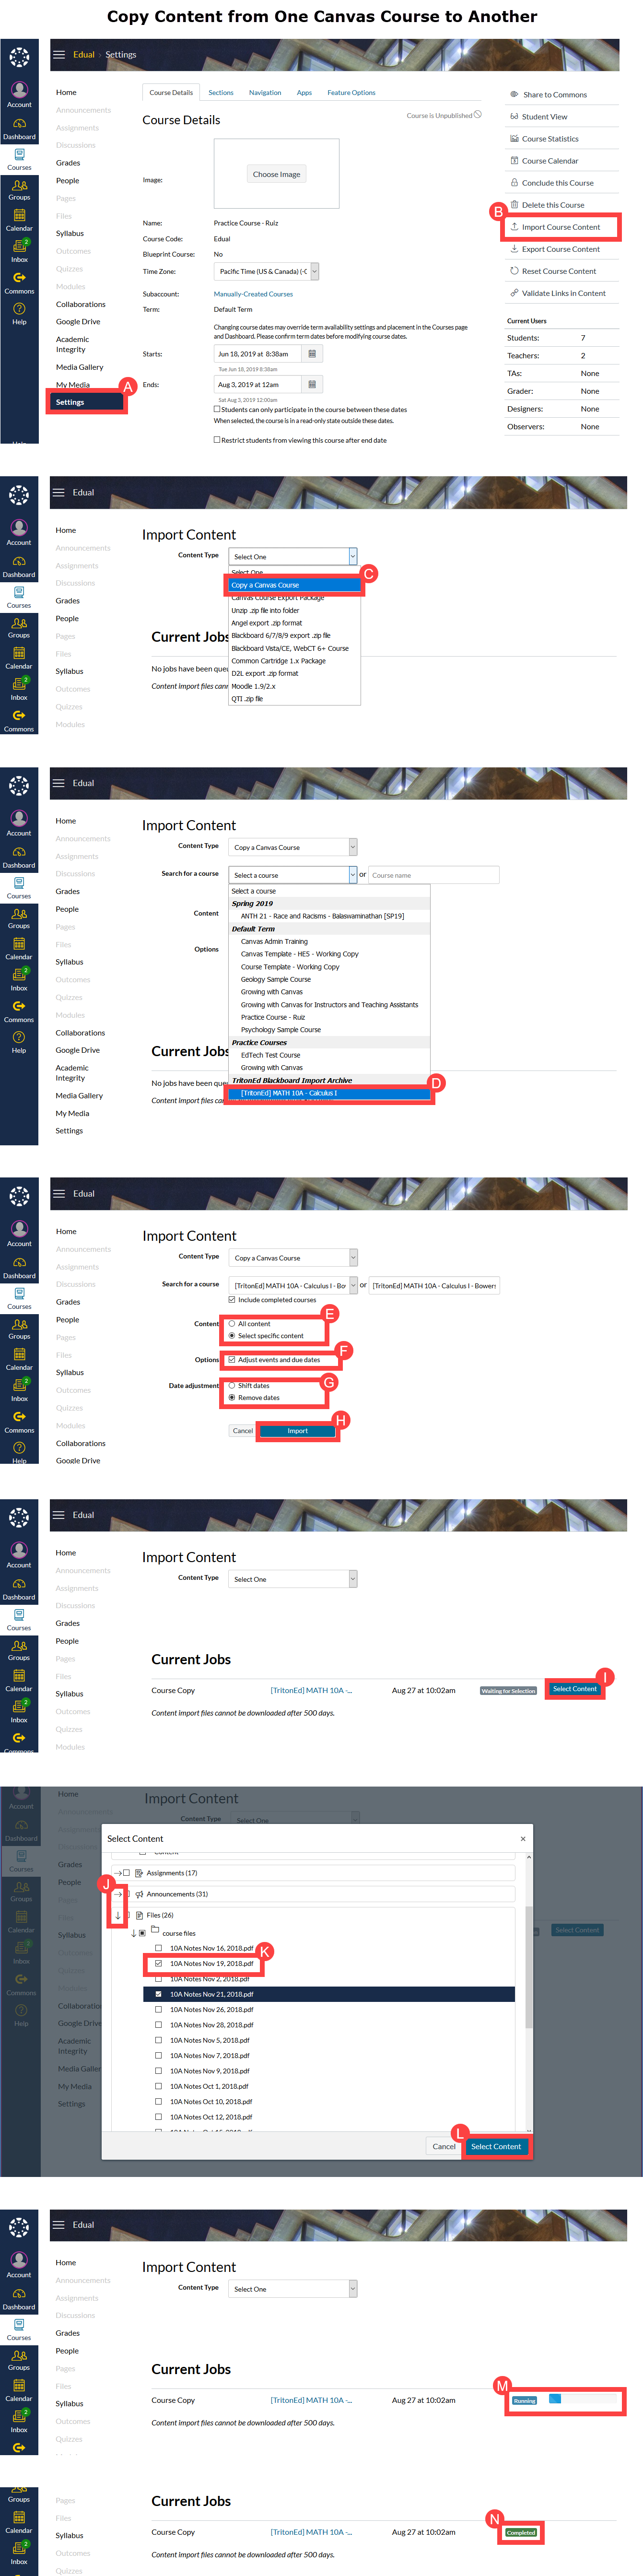
You can copy part of or an entire course's content into a new course.
Instructions
- Open the empty course and click on its Settings link in the course menu.
- Click the Import Course Content link in the sidebar.
- Select the Copy a Canvas Course option in the "Content Type" dropdown.
- In the "Search for a course" field, locate and select your old course in the dropdown menu.
- Select whether to bring all or some of the old content.
- If you decide to bring all content over, every file and assignment, including duplicate and old versions, will be copied over.
- We recommend selecting specific files to avoid a lot of cleanup later on.
- If copying assignments and tests, turn on the Adjust events and due dates checkbox.
- Otherwise, skip to step H.
- If this is the first time your copying content into Canvas, we recommend using the Remove dates option.
- Click the Import button.
- If you previously opted to only copy part of your old course, click the Select specific content, button.
- If you decided to copy everything, skip to step M.
- If selecting specific content, use the arrows to drill down to individual files and assessments.
- Ensure that all desired files are selected by turning on their respective checkboxes.
- Click the Select Content button.
- The course copy process will begin and display a blue progress bar.
- The process typically takes a few minutes at most.
- A "Completed" status should appear, along with any issues, such as broken links or missing files.
Detailed step-by-step instructions: Using the Course Import Tool (text-based instructions)
Visual Aid
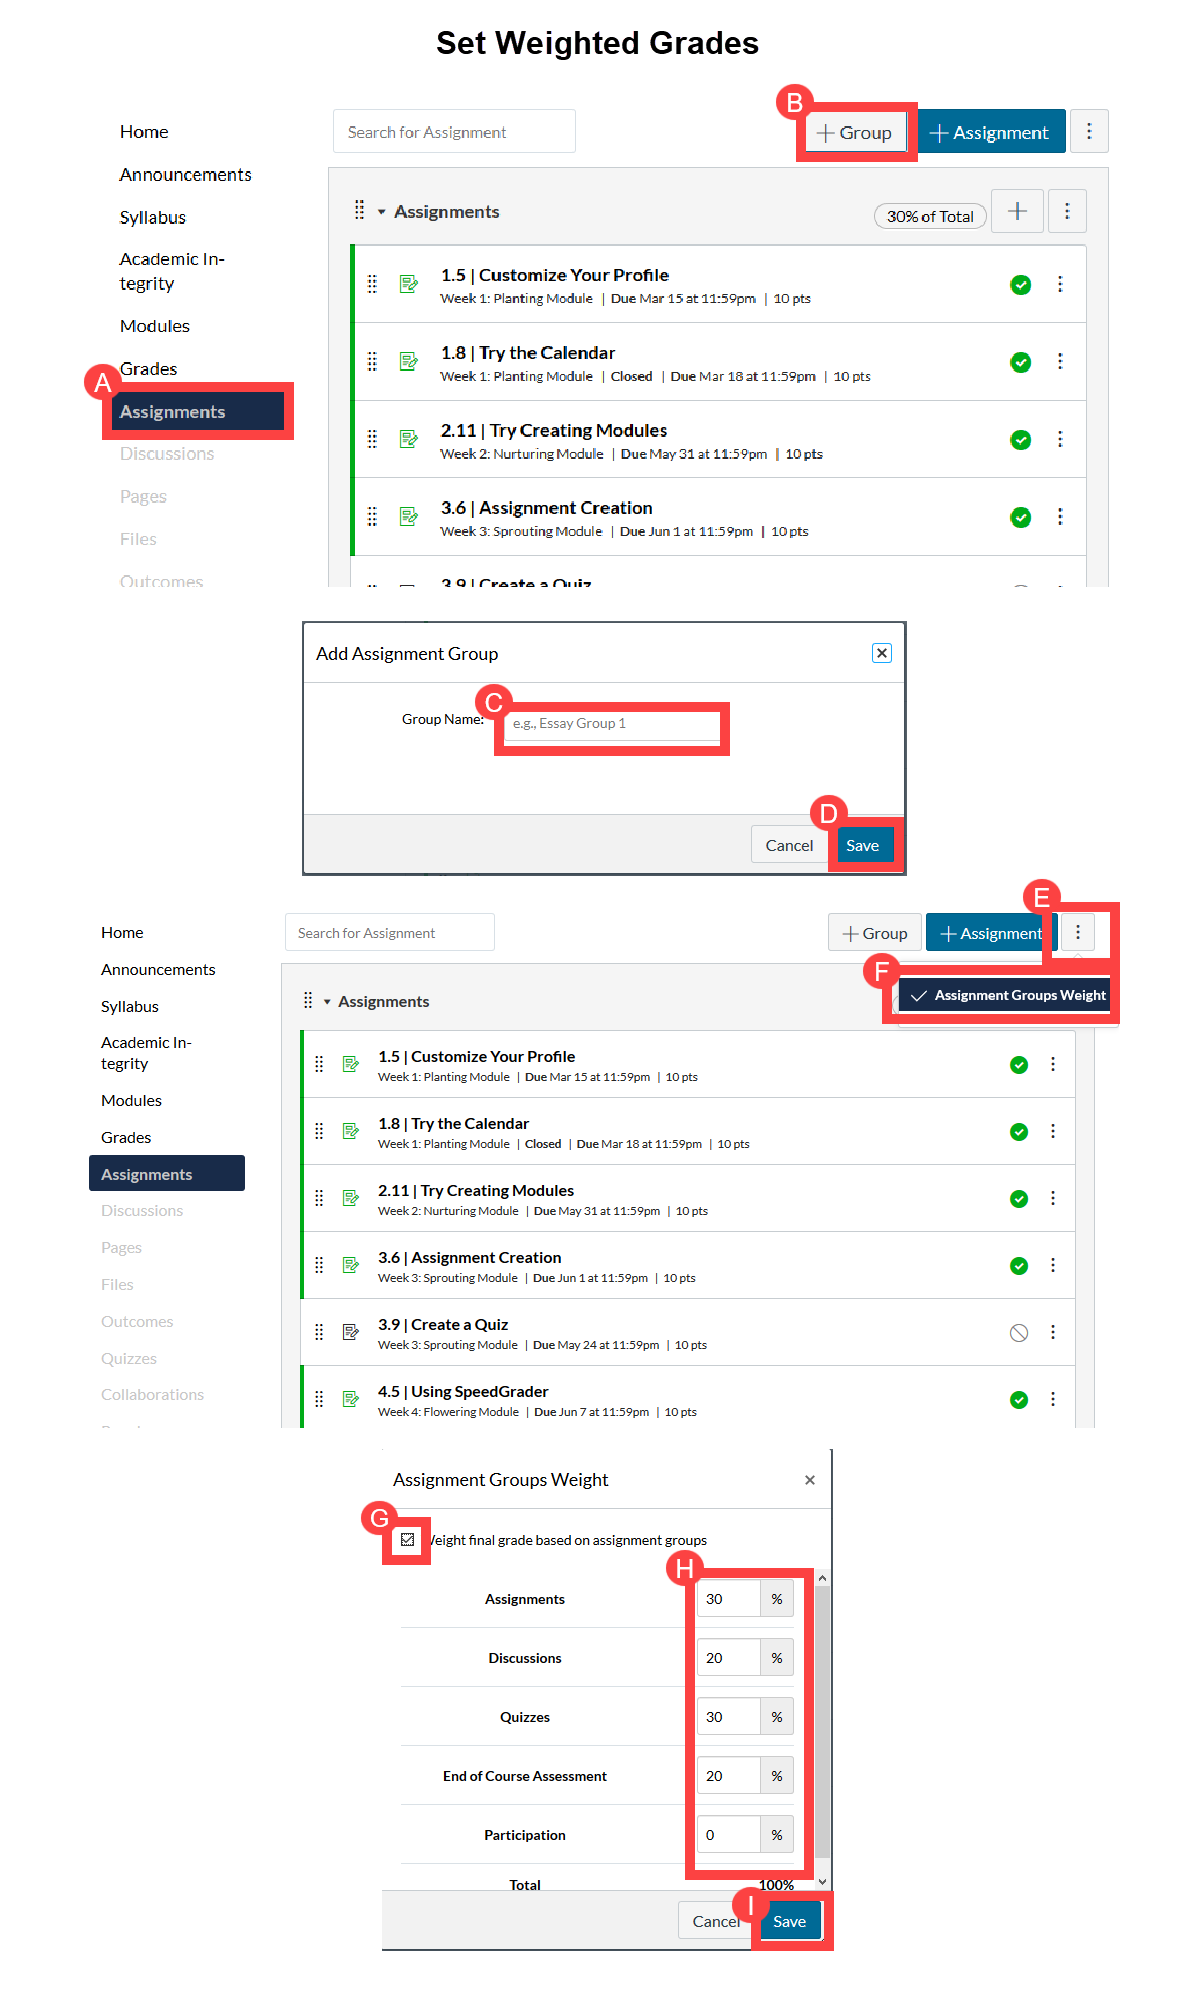
If you are using weighted grades (eg, exams are worth 60% while writing assignments are worth 40%) to calculate a final grade, please ensure that all the weights are defined in the assignments page by creating assignment groups and their corresponding percentages.
Instructions
- Click Assignments.
- Click +Group button to create assignment groupings, if necessary. Otherwise, skip to step E.
- Enter the name of the group.
- Click the Save button.
- On the Assignments page, click the three dot button button at the top of the page.
- Click on Assignment Groups Weight option.
- Turn on the "Weight final grade..." checkbox.
- Enter the percentage value for each assignment group.
- Click the Save button.
Detailed step-by-step instructions: Weight Final Grade (text-based instructions)
Visual Aid
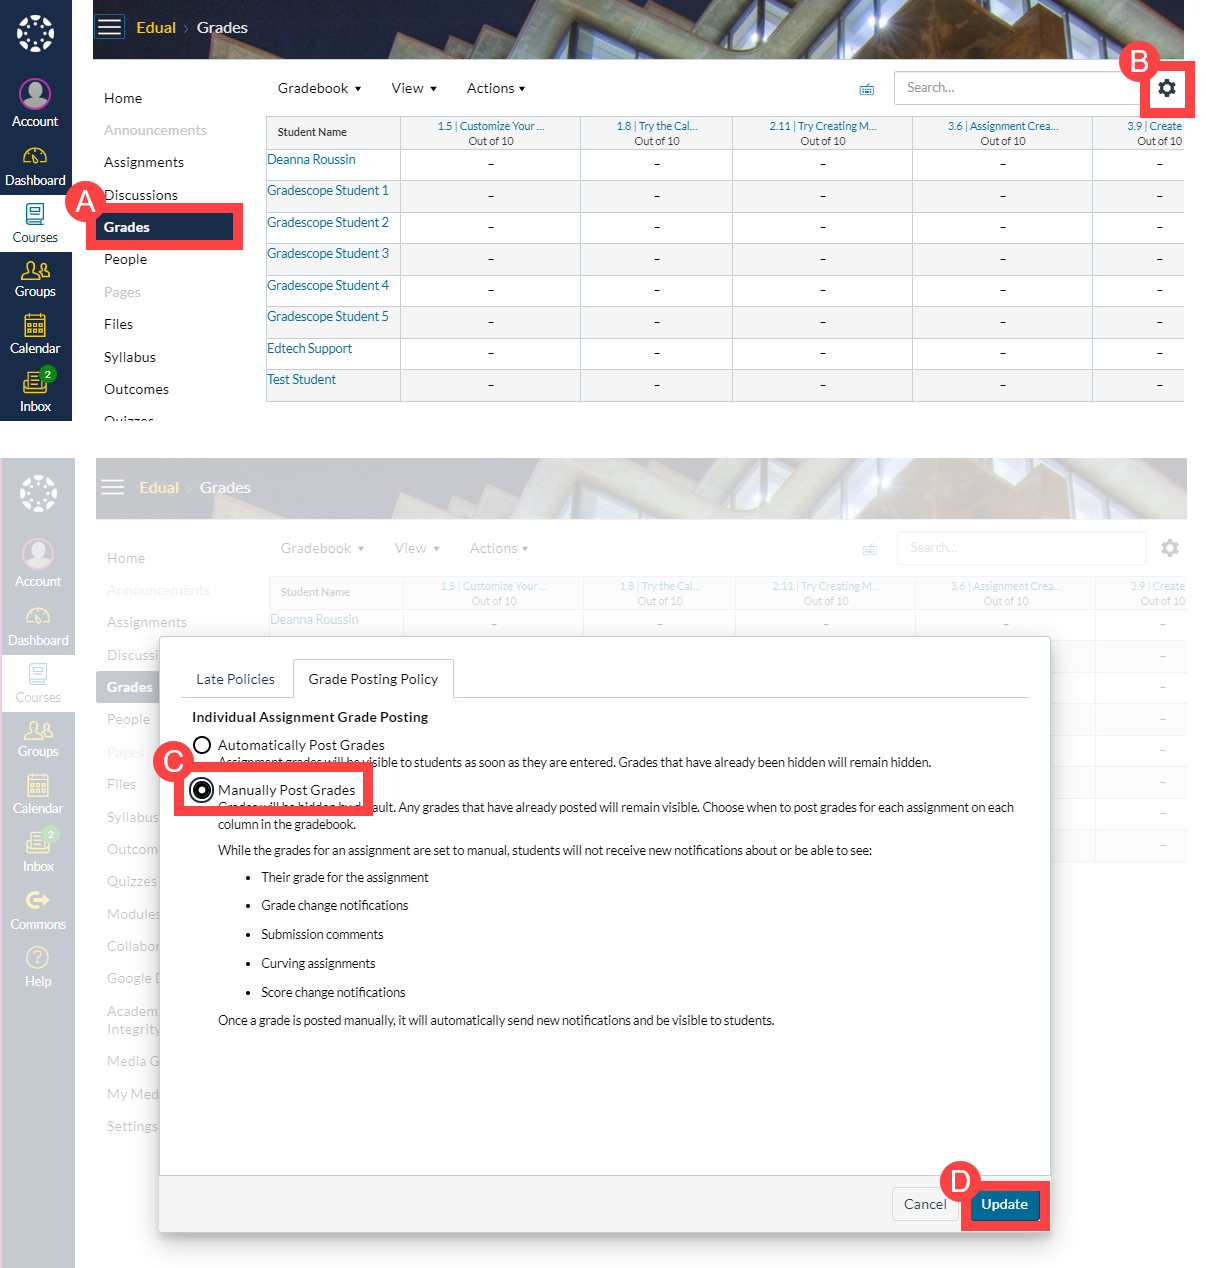
Hidden grades (formerly referred to as muted assignments) can now be set up in advance by selecting a default grade posting policy. The policy, by default, is set to automatically post a grade as soon as you enter it into the gradebook. However, you can choose to postpone and manually release grades when you're ready. Additionally, you can set exceptions for a specific assignment be defining its own posting policy*.
Instructions
- In your course menu, click the Grades link.
- Click the gear icon at the far right-side of the gradebook.
- Select Manually Post Grades from the drop down menu.
- Click the Update button.
Detailed step-by-step instructions: Select a default posting grade policy (text-based instructions).
*To set up specific assignment exceptions see Post Grades for an Assignment (text-based instructions).
Visual Aid
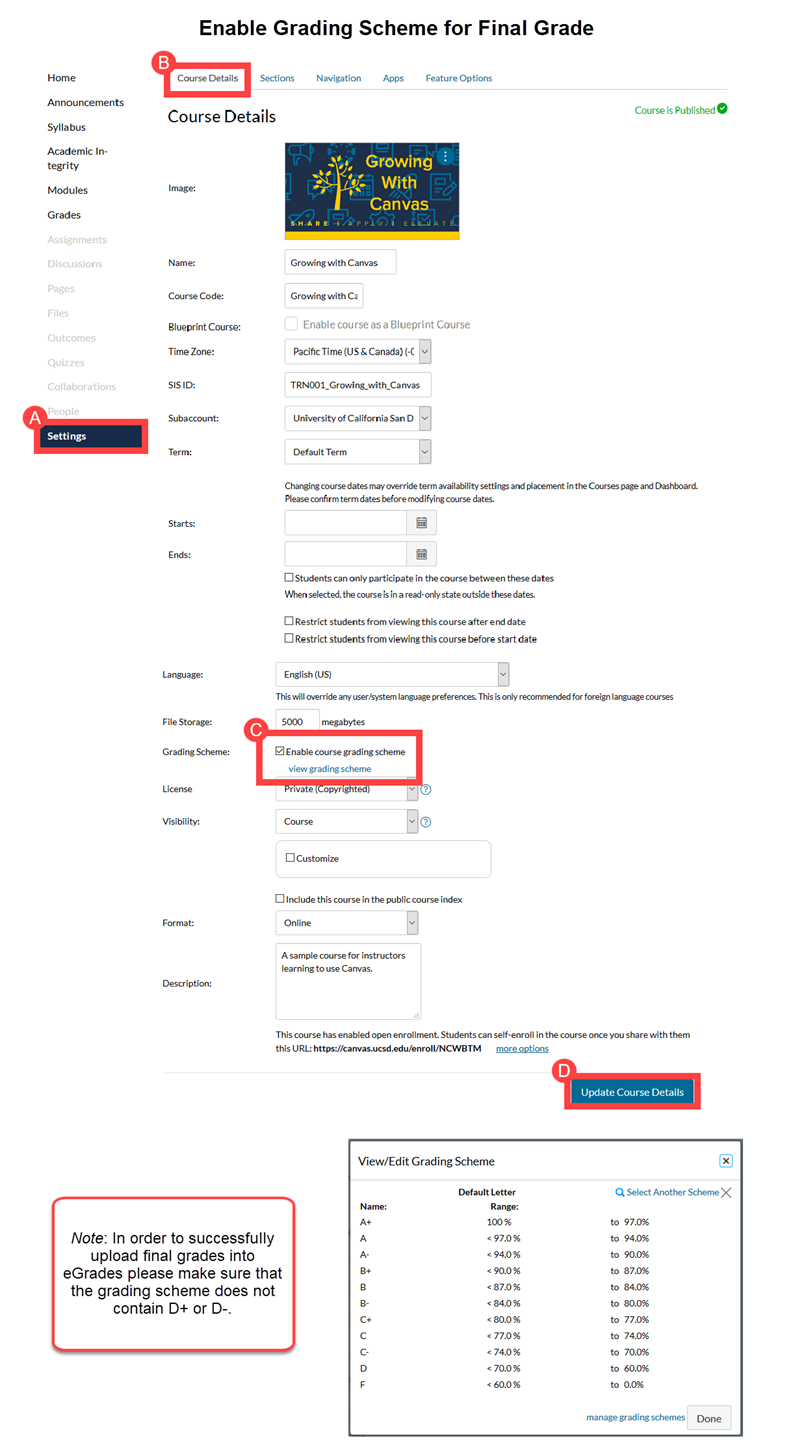
By default, students will see their final grade as a percentage. If you would like to associate the percentage with a letter grade, please enable a grading scheme in your course settings. When selecting (or creating) a grading scheme, please make sure to omit “D+” and “D-“, because eGrades does not accept these two letter grades.
Instructions
- In your course menu, click the Settings link.
- Select the Course Details tab.
- Turn on the "Enable course grading scheme" checkbox. Click the view grading scheme link.
- We recommend selecting the "Default Letter" grading scheme, which is eGrades-compatible.
- Click the Update Course Details button.
Detailed step-by-step instructions: Use grading schemes in a course (text-based instructions).
Visual Aid
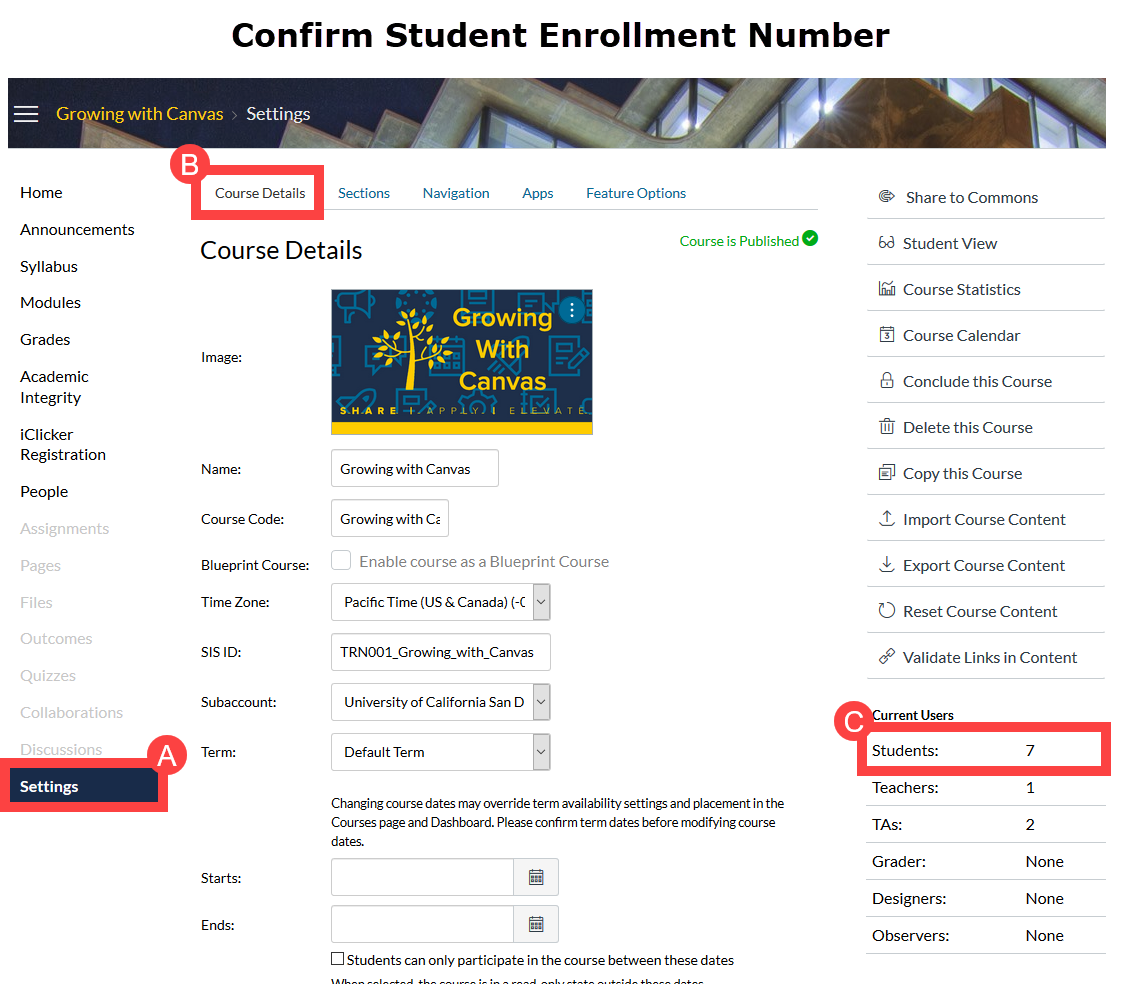
Students are typically added to Canvas courses the week before the start of the term. Once the course is populated with students, please review the roster and confirm student enrollment count by following the instructions below. Any discrepancies should be reported to canvas@ucsd.edu.
Instructions
- Click Settings in the course menu.
- Click the Course Details tab at the top of the page.
- Locate the course's student count in the sidebar's "Current Users" section.
- The number of enrolled students will appear next to the "Students:" label.
- The number, initially, includes both enrolled and waitlisted students.
- Drop students are removed from the course after the third week of Fall, Winter, and Spring terms, and after the first three days of Summer courses.
Visual Aid
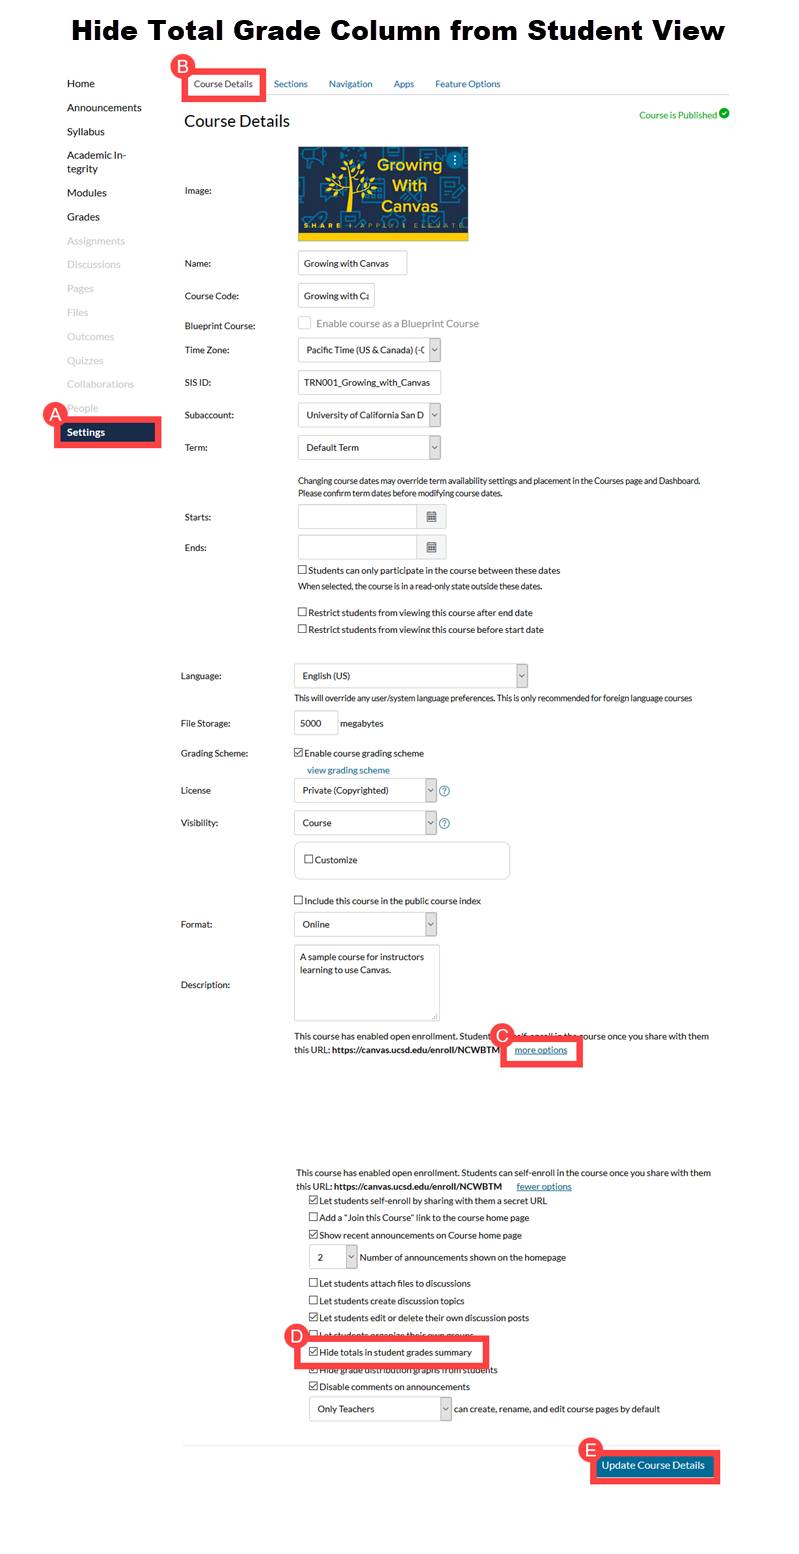
If you would like to hide the Total grade column from students, this is a good time to go into your course settings and temporarily disable students’ access to their final grade.
Instructions
- In your course menu, click the Settings link.
- Select the Course Details tab.
- Click on the more options link at the bottom of the page.
- Check the "Hide totals in student grade summary" checkbox.
- Click the Update Course Details button.
Detailed step-by-step instructions: Hide Totals in Students' Grade Summaries (text-based instructions)
Visual Aid
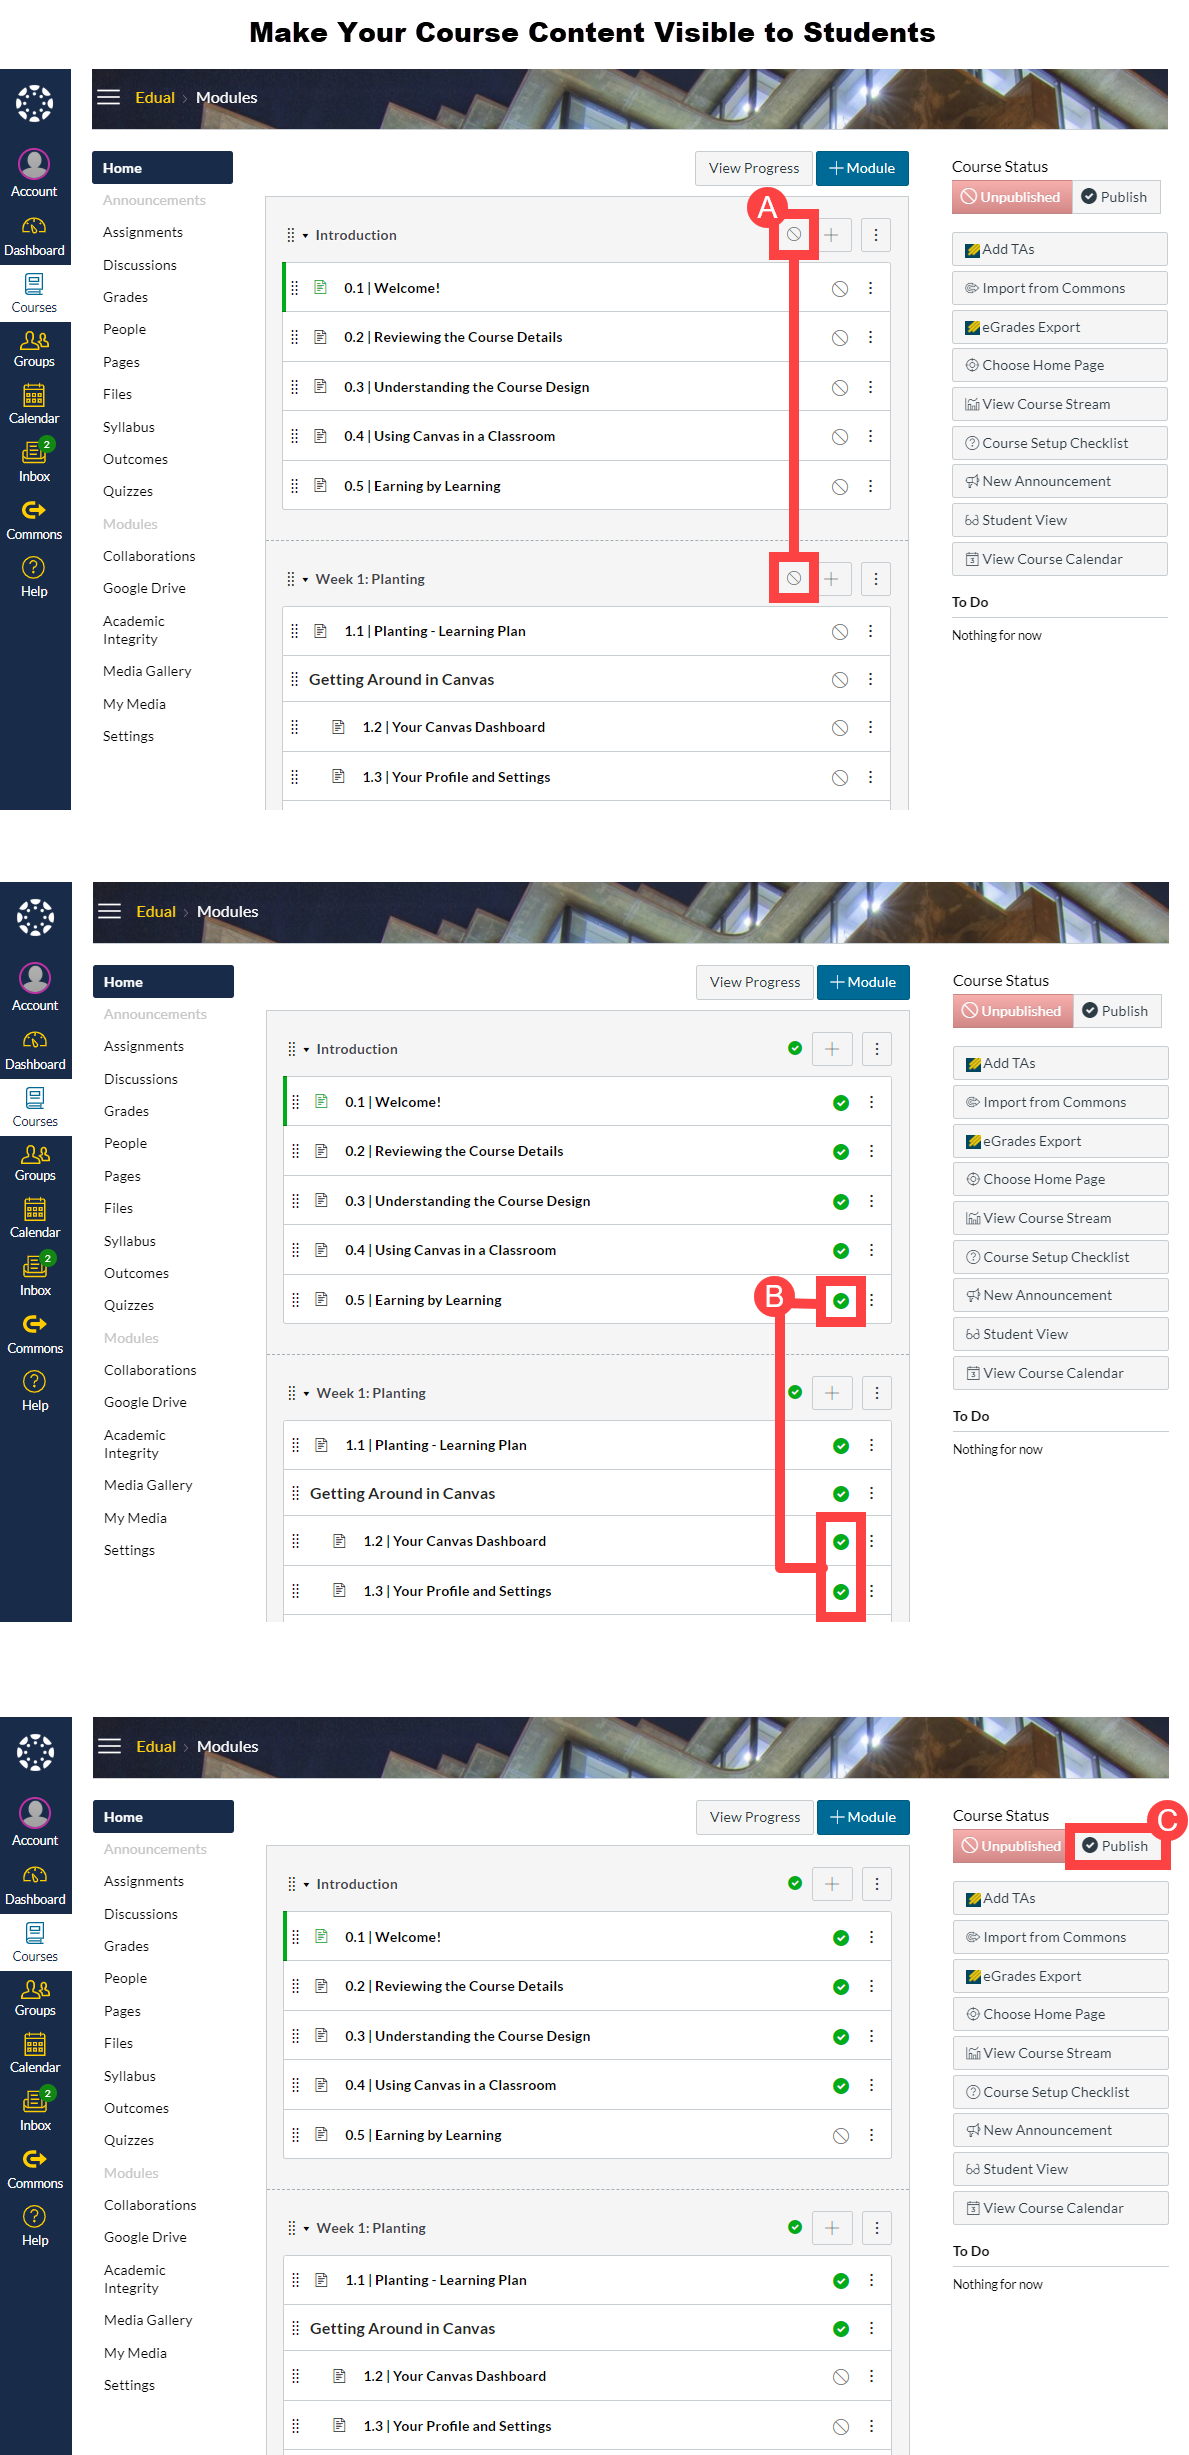
Students won't be able to access files, assignments, pages, modules, etc., unless you publish those items. So don't forget to publish all your content items (eg, files and assignments). Publish your modules. And, last but not least, publish your course.
Instructions
- On course homepage (if using modules), click on the slashed circle icon to the right of each module title.
- Slashed circles should convert to green circles with a white checkmark, indicating that the module AND all its items are visible to students.
- Unpublish any item by clicking on the item's green circle icon.
- Go to the "Course Status" section in the homepage's sidebar and click the Publish button.
- The course will be queued for visibility starting on the official first day of instruction, unless you customized your start and end dates.
Detailed step-by-step instructions: Publish a Course (text-based instructions)
Visual Aid
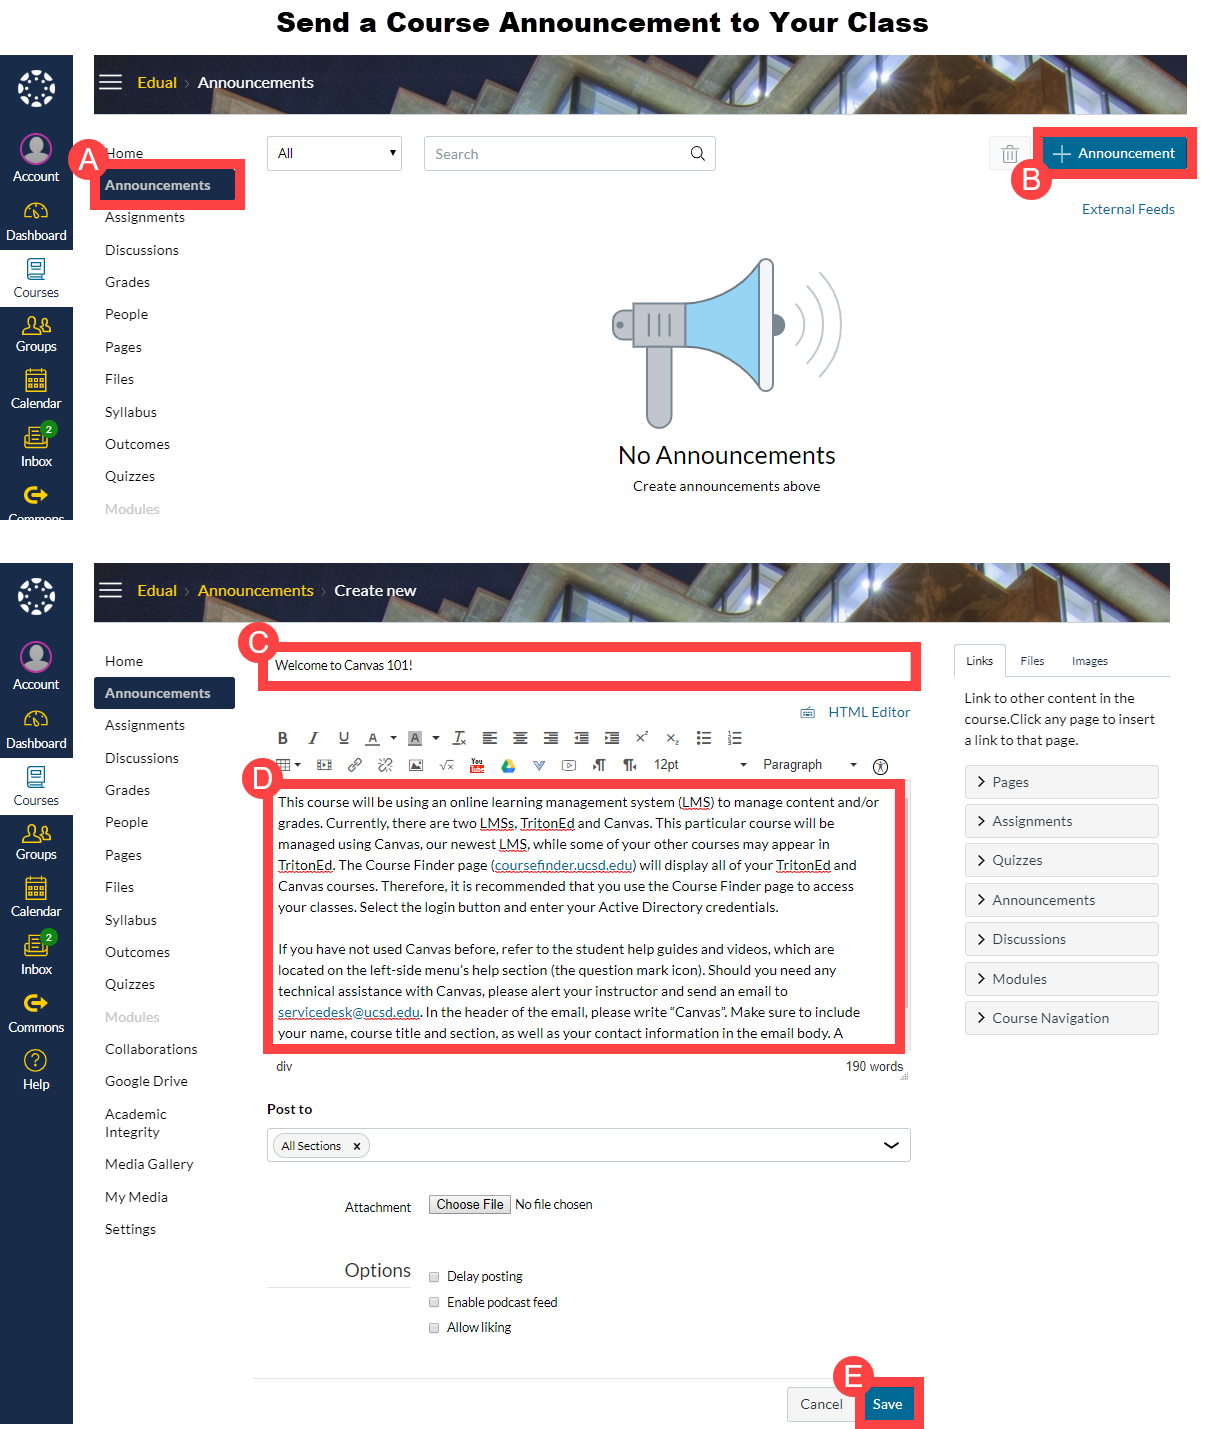
Help students find your course by sending them a welcome announcement. But before you send that announcement, keep in mind that Canvas course announcements will only send students email notifications after the start of the term, unless you have set a custom start date. Any announcements you send before the start of the term will not generate an email message.
Announcement Template
We have included suggested language for your welcome message:
This course will be using an online learning management system (LMS) to manage content and/or grades. Navigate to canvas.ucsd.edu to locate your course when the term commences. Select the login button and enter your Active Directory credentials.
If you have not used Canvas before, refer to the student help guides and videos, which are located on the left-side menu’s help section (the question mark icon). Should you need any technical assistance with Canvas, please alert your instructor and send an email to servicedesk@ucsd.edu. In the header of the email, please write “Canvas”. Make sure to include your name, course title and section, as well as your contact information in the email body. A representative will get back to you within 48 hours (Monday through Friday).
Instructions
- Click on Announcements.
- The link may appear in a light gray font, which means that the link is not currently visible to students because there are no announcements.
- Click the +Announcement button.
- Add a title to your announcement
- Copy and paste the suggested language, or craft your own message, in the rich content editor.
- Click the Save button.
- This will immediately send the announcement to the class or section.
Detailed step-by-step instructions: Add an Announcement (text-based instructions)
Visual Aid