At the conclusion of the term, the course will go into a read-only state. Students, by default, will not be able to submit any assignments after the last day of the term to preserve the course's integrity. You can extend/shorten the student assessment submission period in your course by adjusting the start and end dates.
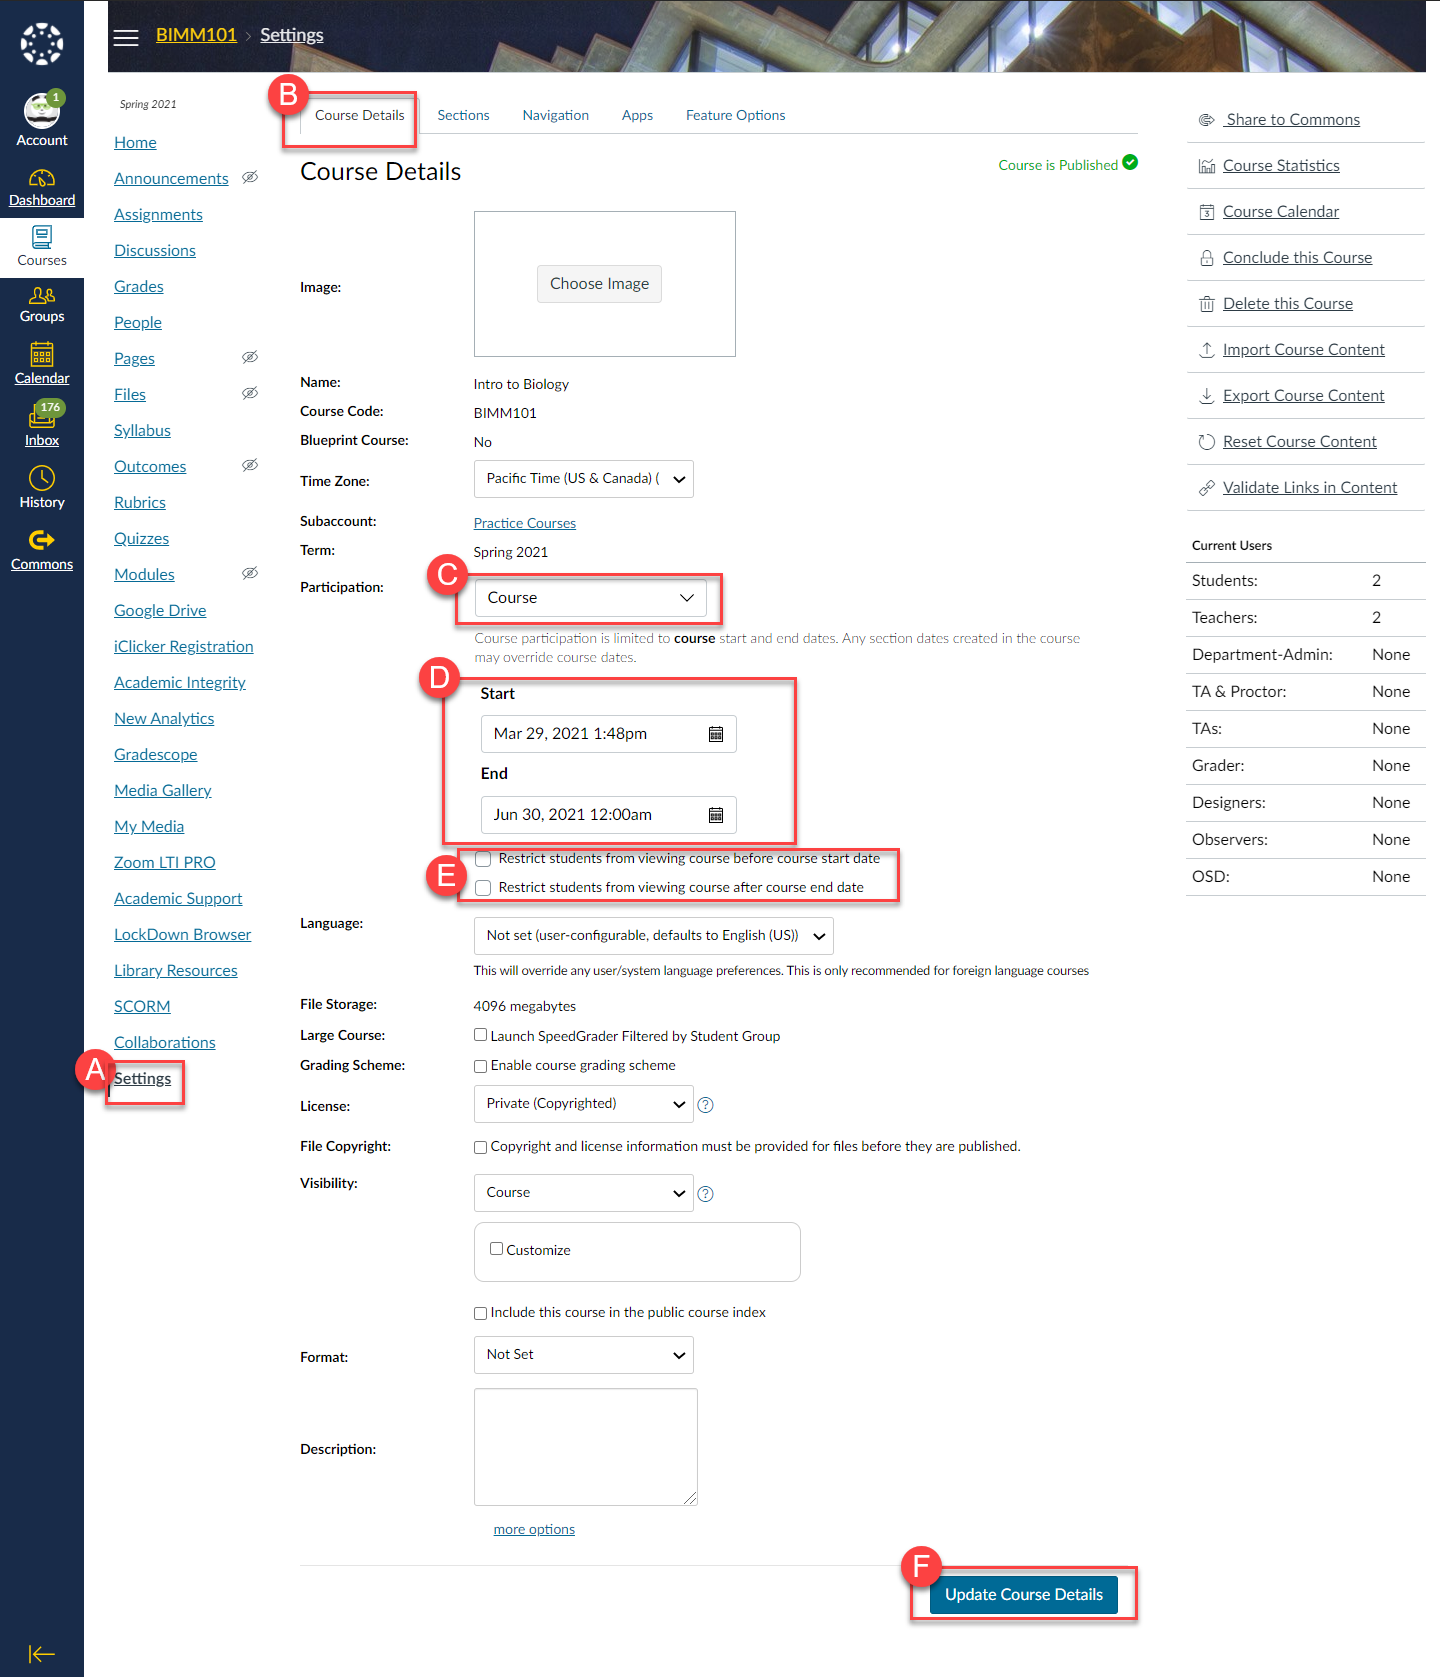
Instructions
- Click Settings.
- Click the Course Details tab.
- Locate Participation and change the drop down to Course.
- Fill out the Start and End fields.
- If no end date is provided, the course will be available indefinitely to students. This may increase student inquiries as to why the course remains on their Canvas dashboard after the term concluded.
- Check off if you would like to restrict the students viewing the course before or after the course dates.
- A start date and end date is needed for these features to work.
- Click the Update Course Details button.
Detailed step-by-step instructions: Set Custom Course Dates (text-based instructions)
Visual Aid
TAs, observers and other instructional staff can be added or removed from a past Canvas course by the instructor of record. The teacher role is typically reserved only for the instructor of record, and is, therefore, not an option for other users in the course. Also, unlike current term courses, access to past courses is view-only with no add/edit/delete privileges regardless of assigned role.
Instructions
- Navigate to the respective Canvas course's Settings page.
- Select Add TAs
- Type in the user's UC San Diego email address.
- Only use AD email address. Do not use alias emails or extensions, like "@eng.ucsd.edu".
- Select the appropriate role for the user from the dropdown list.
- The TA role allows view-only access to content and grades. Also, allows TA to copy content into future courses.
- The Grader role allows view-only access to assessments and grades.
- The Designer role allows view-only access to content. Not able to view grades. Also, allows designer to copy content into future courses.
- The Observer role allows view-only access to content.
- Click the Add Teaching Assistant button.
- (Optional): To remove a TA or other instructional staff role from the course, locate the user in the Status section and click the corresponding Delete button.
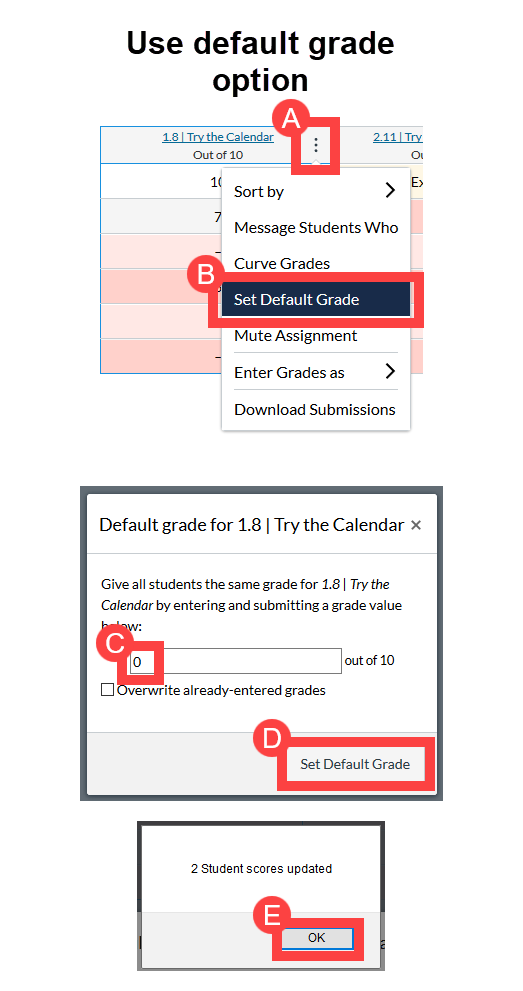
The Canvas gradebook operates on a running total score. This means that assignments without scores (as denoted with “-“ in the cell) don't impact (negatively or positively) a student’s grade. Required assignments that have not been submitted need to have a “0” in the cell in order for the final grade to reflect accurately.
Instructions
- Go to Grades and locate assignment. Click the three dots icon.
- Click the Set Default Grade option in the menu.
- Enter "0" (without the quotes) in the text field. Leave the checkbox blank.
- Click the Set Default Grade button
- Confirm the updated score by clicking the OK button
Detailed step-by-step instructions: Set Default Assignment Grade (text-based instructions)
Visual Aid
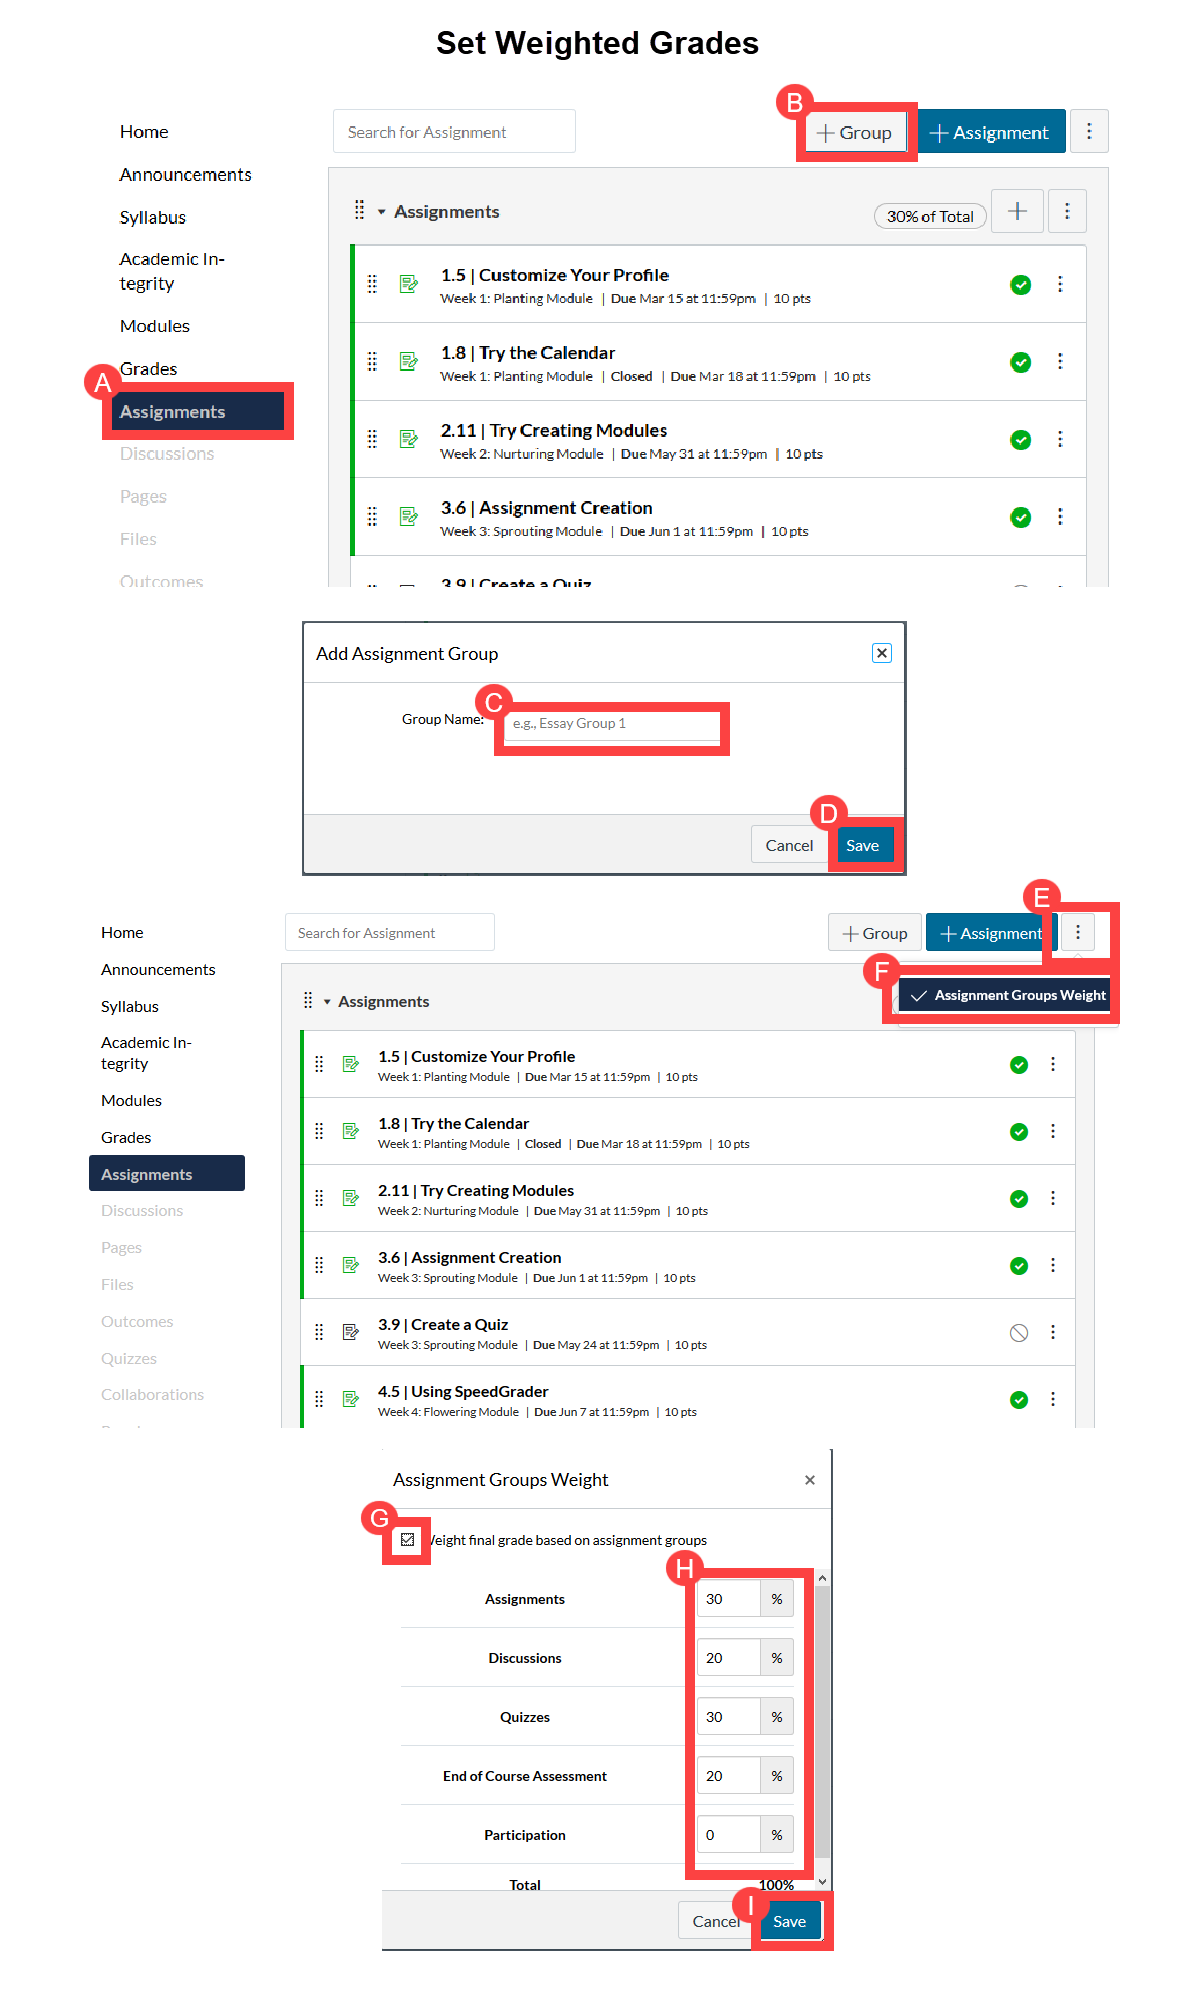
If you are using weighted grades (eg, exams are worth 60% while writing assignments are worth 40%) to calculate a final grade, please ensure that all the weights are defined in the assignments page by creating assignment groups and their corresponding percentages.
Instructions
- Click Assignments.
- Click +Group button to create assignment groupings, if necessary. Otherwise, skip to step E.
- Enter the name of the group.
- Click the Save button.
- On the Assignments page, click the three dot button button at the top of the page.
- Click on Assignment Groups Weight option.
- Turn on the "Weight final grade..." checkbox.
- Enter the percentage value for each assignment group.
- Click the Save button.
Detailed step-by-step instructions: Weight Final Grade (text-based instructions)
Visual Aid
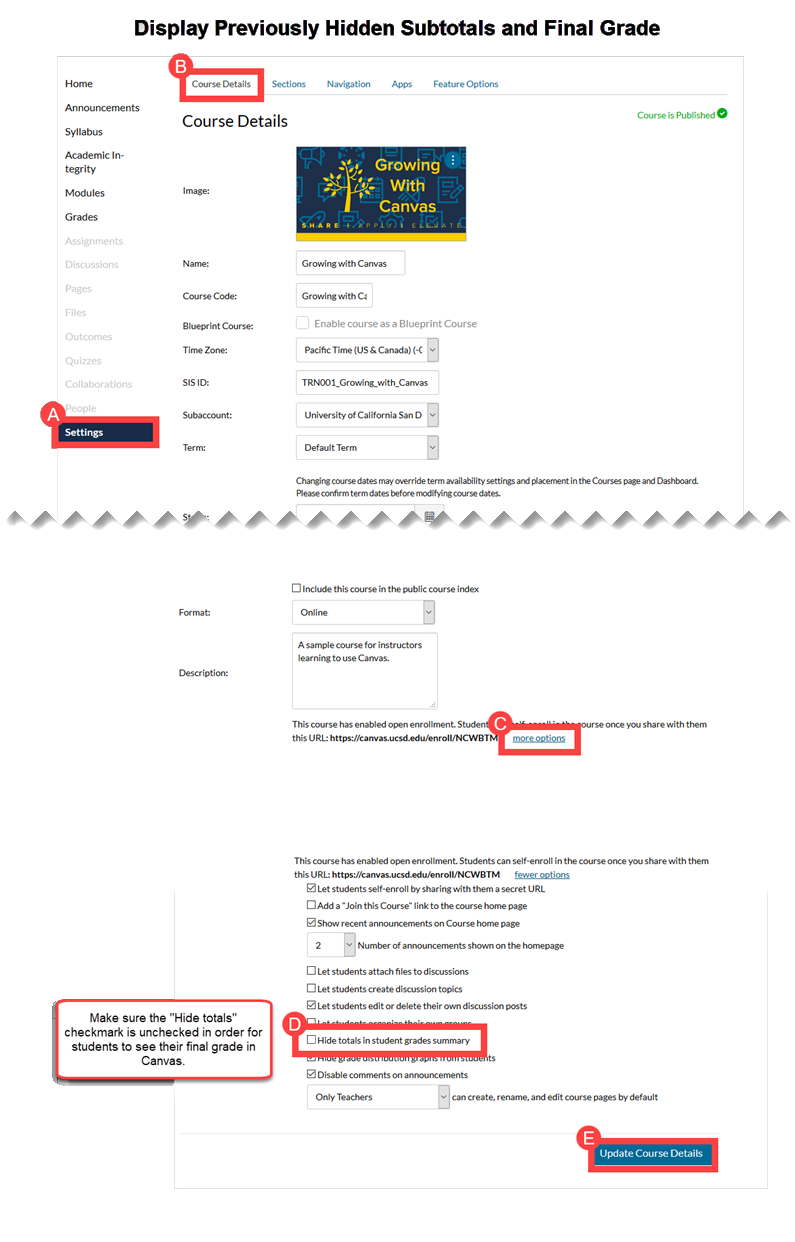
If you have previously hidden final grades from students, this is a good time to go back into your course settings and re-enable students’ access to their final grades.
Instructions
- In your course menu, click the Settings link.
- Select the Course Details tab.
- Click on the more options link at the bottom of the page.
- Uncheck the "Hide totals in student grade summary" checkbox.
- Click the Update Course Details button.
Detailed step-by-step instructions: Hide Totals in Students' Grade Summaries (text-based instructions)
Visual Aid
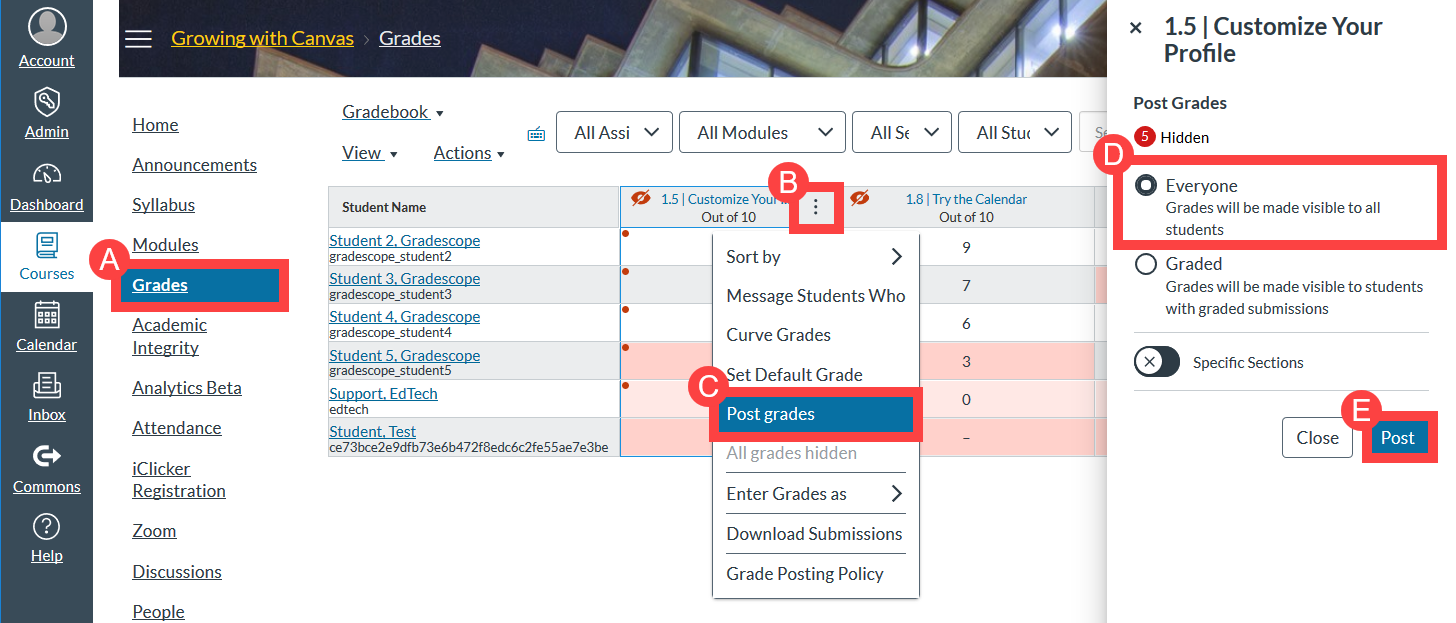
Hidden grades (formerly referred to as muted assignments) do not count towards the final grade, so please make sure to post grades for every required assignment.
Instructions
- In your course menu, click the Grades link.
- Locate the assignment with the hidden grades (look for a red, slashed eye icon), and click on the three dots icon button.
- Select Post Grades from the drop down menu.
- Select the Everyone radio button.
- Click the Post Grades button.
Detailed step-by-step instructions: Post Grades for an Assignment (text-based instructions).
Visual Aid
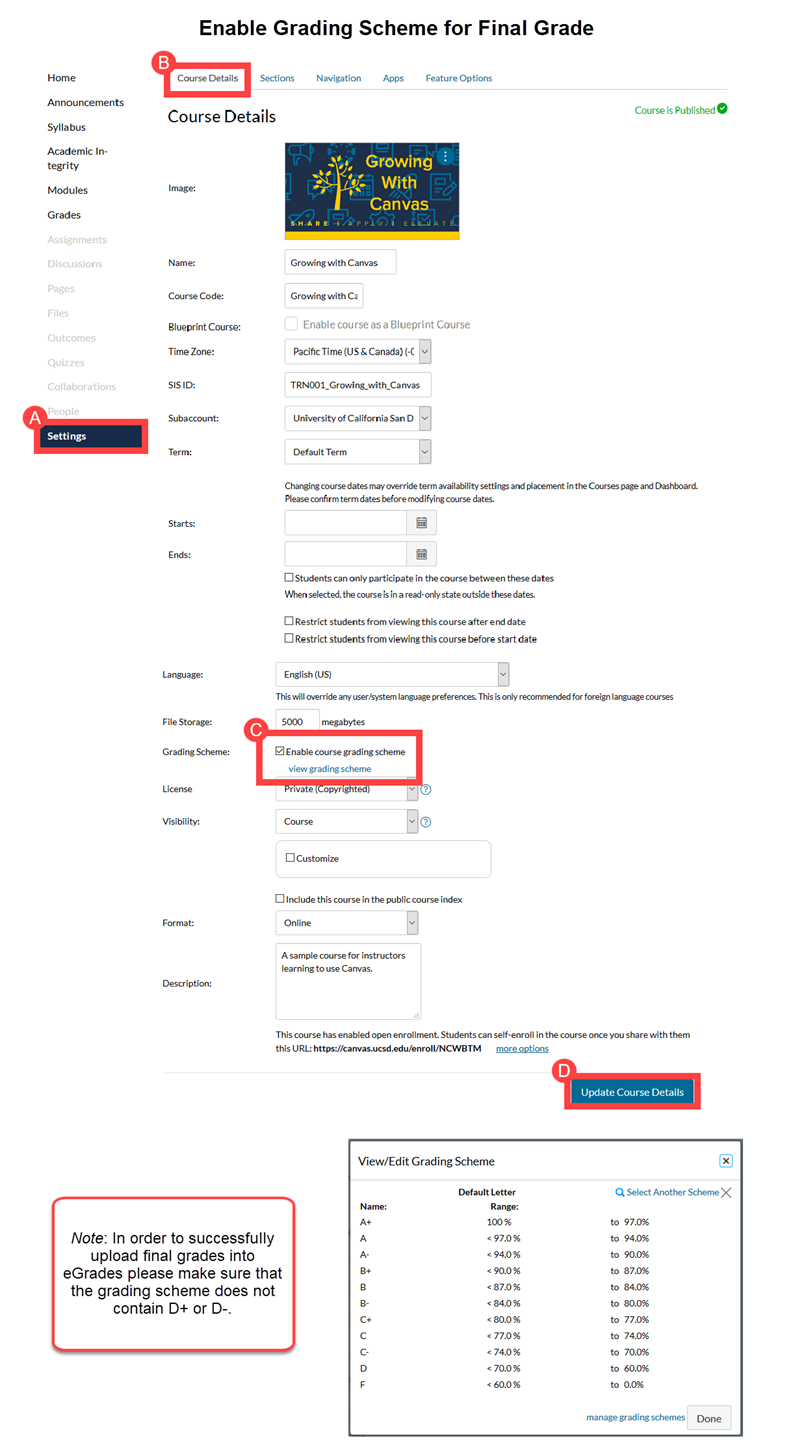
By default, students will see their final grade as a percentage. If you would like to associate the percentage with a letter grade, please enable a grading scheme in your course settings. When selecting (or creating) a grading scheme, please make sure to omit “D+” and “D-“, because eGrades does not accept these two letter grades.
Instructions
- In your course menu, click the Settings link.
- Select the Course Details tab.
- Turn on the "Enable course grading scheme" checkbox. Click the view grading scheme link.
- We recommend selecting the "Default Letter" grading scheme, which is eGrades-compatible.
- Click the Update Course Details button.
Detailed step-by-step instructions: Use grading schemes in a course (text-based instructions).
Visual Aid
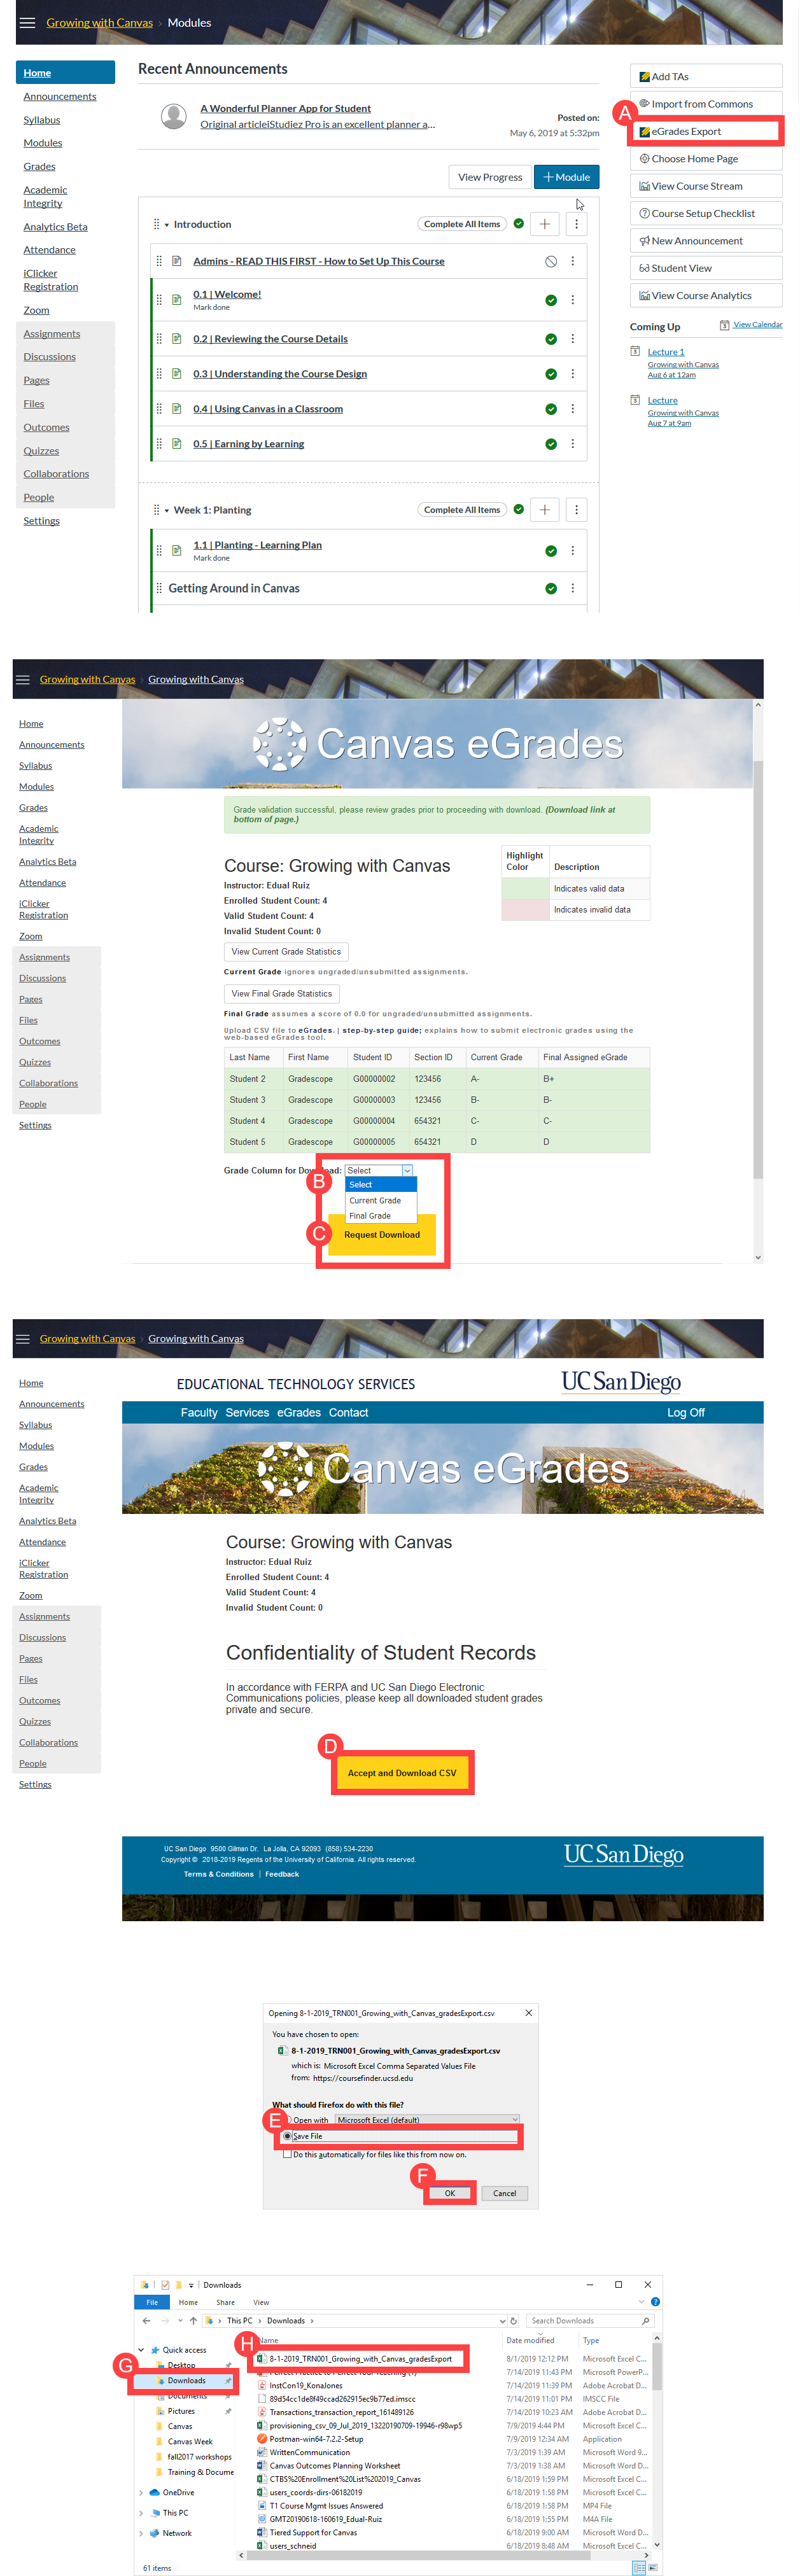
If you would like to use the Canvas grade calculations for eGrades submission, download the populated and pre-formatted file from your Canvas course. Please be aware that you will need to have the "Default Grade Scheme" enabled for your course in order to successfully export grades. See the previous step to enable the grade scheme in your course.
Instructions
- In your course homepage, click eGrades Export.
- Select the grade column to export.
- Current Grade - does not include ungraded or missing assignments in the calculation.
- Final Grade - treats ungraded or missing assignments as zeroes (0) in the calculation.
- Click the Request Download button.
- Click the Accept and Download button.
- Click the Save File button.
- Click the OK button.
- Open File Explorer (PC) or Finder (Mac) and navigate to Download folder.
- Locate your file. It is a comma separated value (CSV) file.
For further assistance with Canvas grade exports, please contact Ed Tech Support.
Visual Aid
Once you've downloaded the CSV file from CourseFinder, make any final adjustments, such as altering a letter grade to incomplete or pass/no pass, and upload to eGrades. The Academic Records office is able to assist with any eGrades-related questions or issues. Their contact information is 858-534-3144 and egrades@ucsd.edu.
Instructions
- Go to egrades.ucsd.edu.
- Sign in using your Single Sign-On user name and password.
- Go to the Grade Entry screen.
- Click the Import File link.
- Select the CSV Delimited radio button.
- Click the Browse button and select the Canvas grades export file.
- Click the Submit button.
- If there are no errors, click the Close Dialog button.
- Letter grades should now be associated with each student.
- Click the Save & Review button.
- Make sure to enable the "I certify that the grades submitted..." checkbox.
- Click the Submit button.
For further assistance with eGrade submissions, please contact egrades@ucsd.edu.
Visual Aid
Canvas courses typically conclude a week after the official term end date. The course then becomes read-only. However, instructors can re-open previous term courses for themselves and individual students (if desired) by creating an extended access section. Those individuals who are not included in the extended course access section will see the course in a read-only state. Continue reading to learn how to create an extended access section.
- Navigate to the Canvas course where the student will need to complete their coursework
- Go to Settings
- Select Extended Course Access
- Choose the section end date - when you wish for the course to go back into read-only state.
- Choose Create Section
(The instructor should now have access to the course. Continue with the steps below if adding specific students. To reopen the course for the entire class, please refer to the "Review end term date and adjust, if necessary" drawer at the top of the end-of-term checklist.)
- Start typing the name of the student(s) or UC San Diego email of the student(s) to choose the student(s).
- Choose the section you just created from the dropdown.
- Select Assign to Section
Multiple extended access sections can be created, or students can be added to an already existing extended section.